Manage Facility Locations
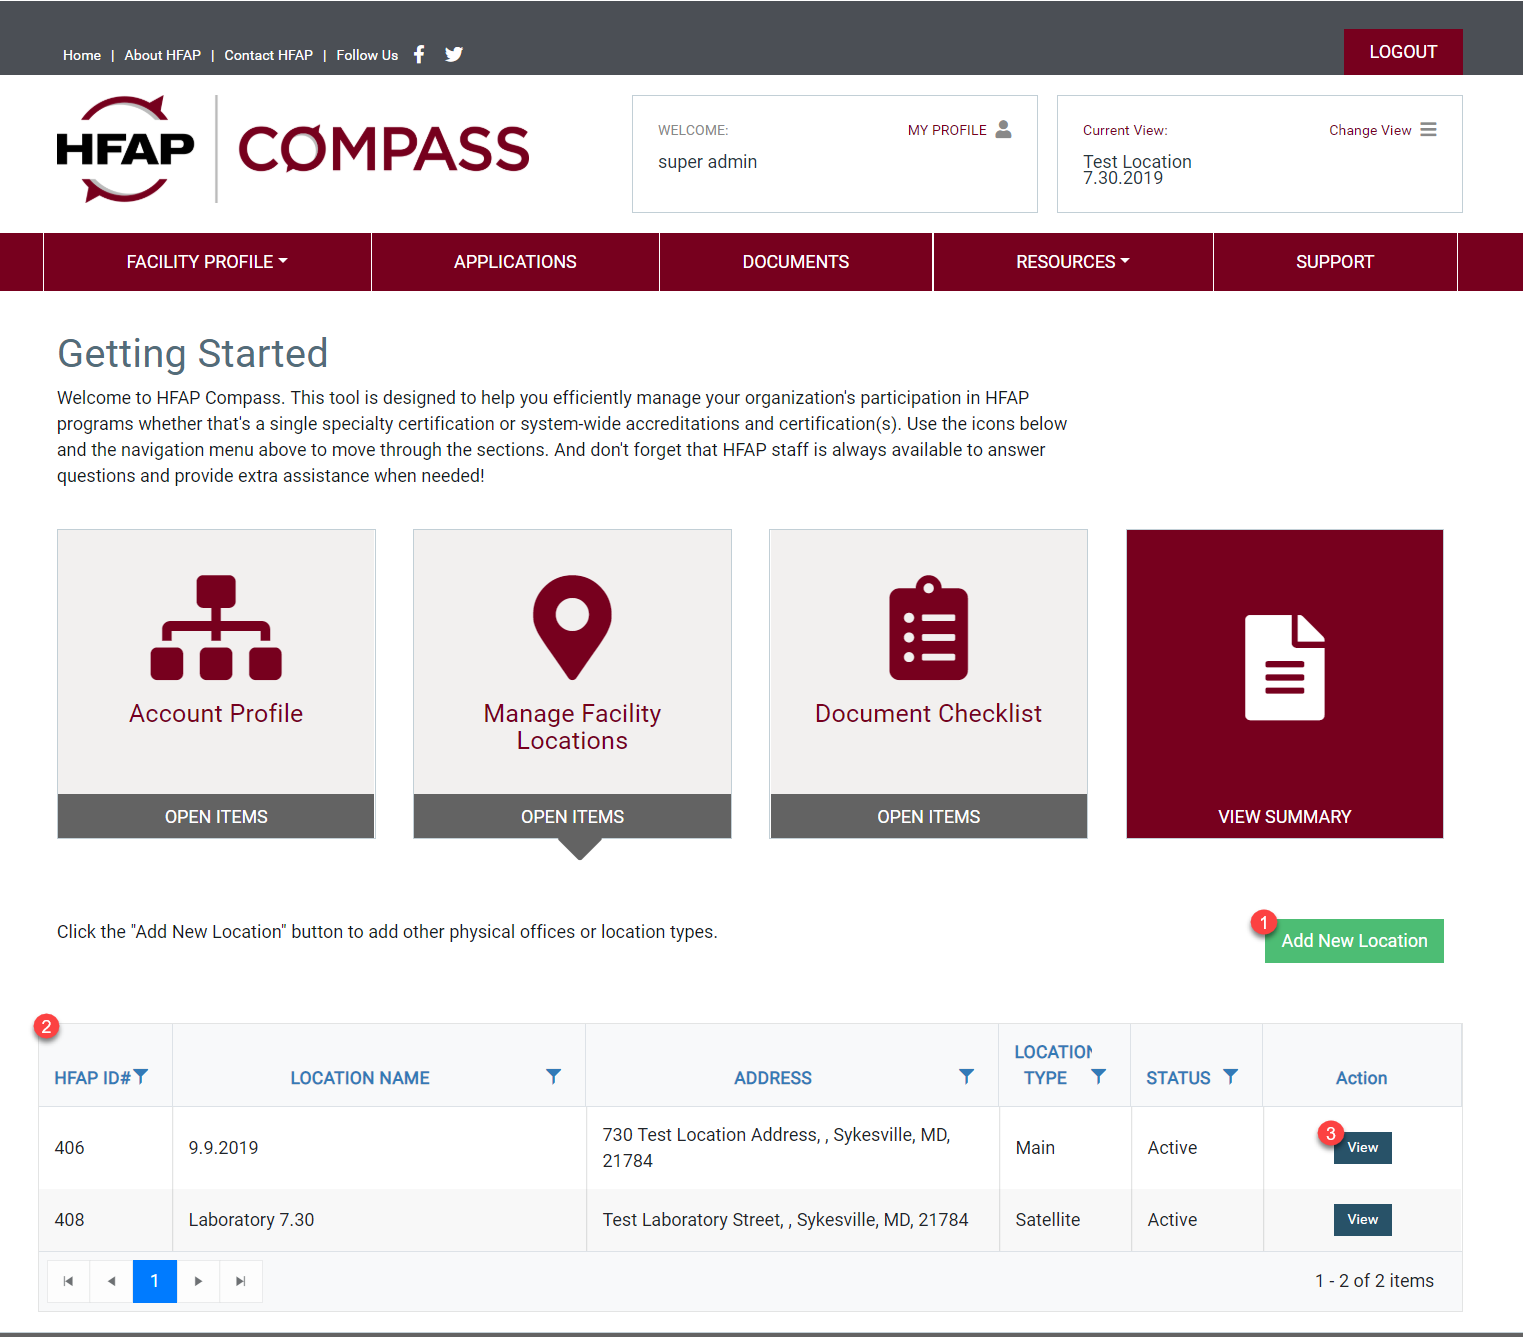
The Manage Facility Locations section is where you will be able to add and edit information for individual facility locations.
Navigation
1. The Add New Location button is used to add additional locations under your Main facility. Once this button is clicked, you will be required to enter the following: demographic info, contacts, location amenities, programs, statistical data, services provided, location affiliation, hours of operation, staff, lab information, proficiency testing results, proficiency testing providers, and laboratory test systems.
2. The Locations table shows a brief overview of location information including: HFAP ID number, location name, location address, location type (either main, satellite, or department), and status of the location. This table will allow you to filter by column.
3. Clicking the View button will allow you to view and edit any information pertaining to that particular location.
Demographics
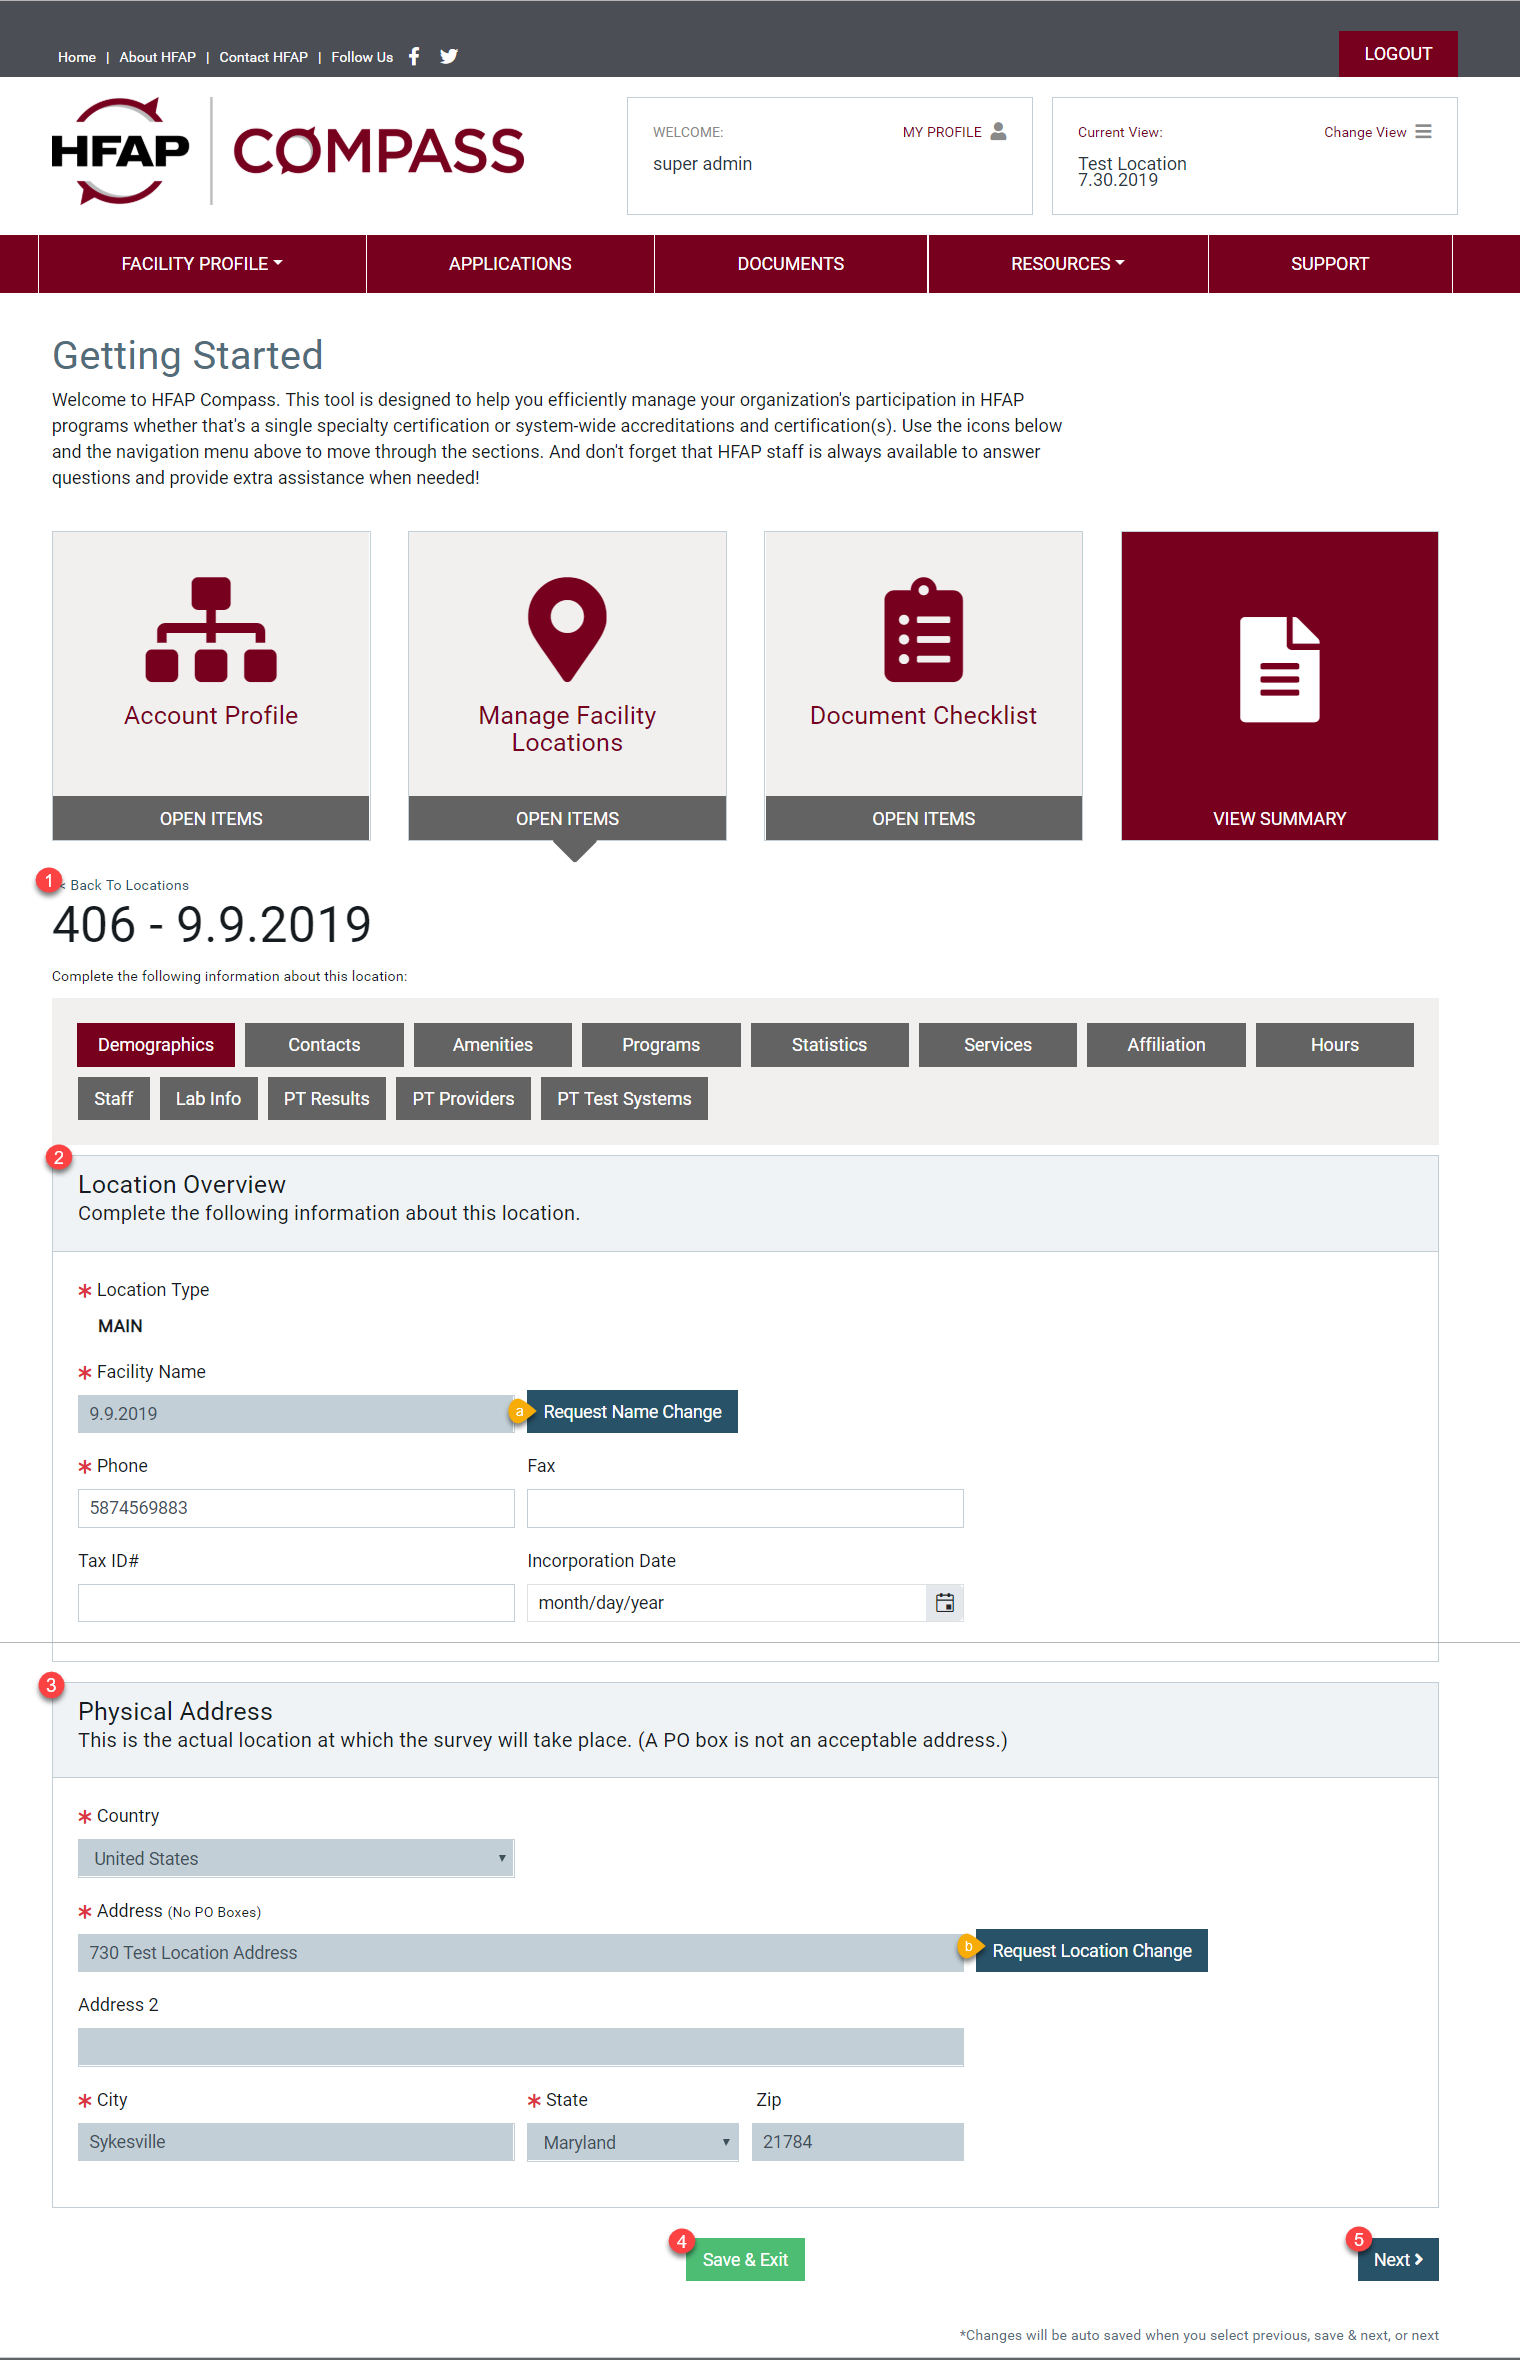
1. The Back To Locations button will allow you to quickly go back to the Manage Facility Locations dashboard without saving the information that has been entered.
2. The Location Overview section is to be completed with your facility’s location type, facility name, phone number, fax number, tax ID number, and incorporation date.
a. To change the facility’s name, you must click the Request Name Change button. Once clicked, a pop-up window will appear where you must answer questions regarding the facility name change for HFAP’s approval. You can also submit a Request Name Change request by going to the Submit Change Request page under the Facility Profile tab.
3. The Physical Address section is to be completed with the facility’s country, street address, city, state, and postal code. Once this information has been submitted, a change request form will be required to change the address.
b. To change the facility’s location information, you must click the Request Location Change. Once clicked, a pop-up window will appear where you must answer questions regarding a location address change for HFAP’s approval. You can also submit a Request of Location Change request by going to the Submit Change Request page under the Facility Profile tab.
4. The Save & Exit button will save all information entered and take you back to the Manage Facility Locations dashboard.
5. The Next button will save your information and take you to the next section, contacts.
Request Name Change
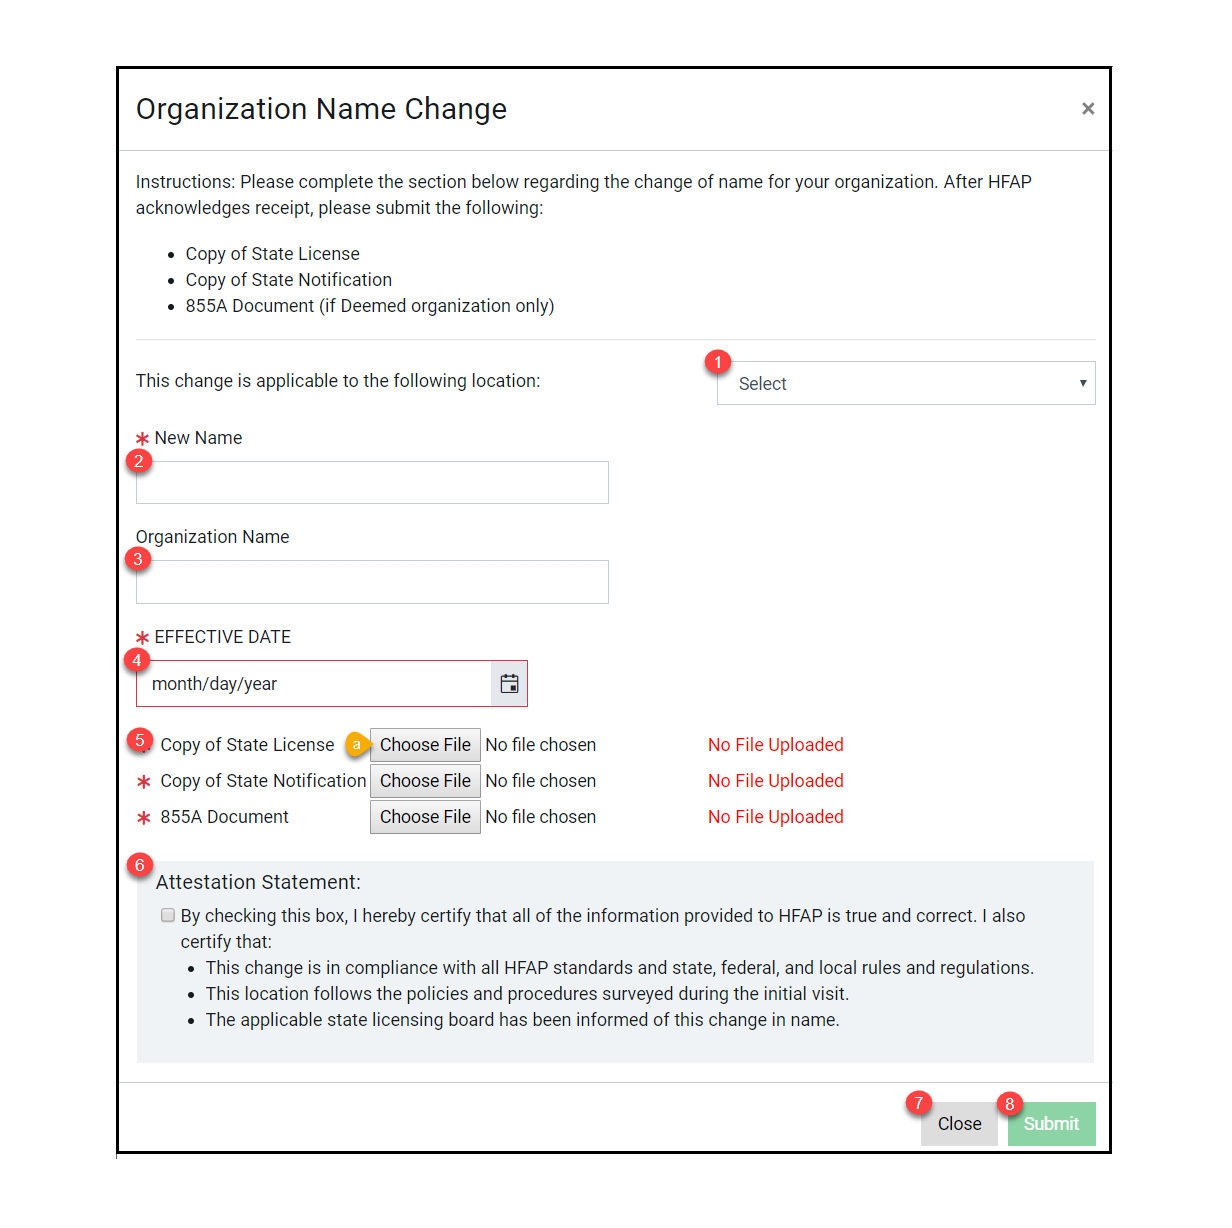
1. The change is applicable to the following location drop down menu will allow you to select the location that you are changing ownership for.
2. The New Name field is where you will enter the new name of your organization.
3. The Organization Name field is where you will enter your current organization name.
4. The Effective Date is when this ownership change takes effect.
5. These are the documents that are required to be submitted along with the change request form.
a. Click the Choose File button to select the file that will be uploaded.
6. The Attestation Statement is a required checkbox that you must check to certify that all of the information provided to HFAP is true and correct.
7. The Close button will close the pop-up window without saving the entered information.
8. The Submit button will save all information entered and submit the change request to HFAP for approval. You will not be able to submit your request until all required information has been entered.
Request Location Change
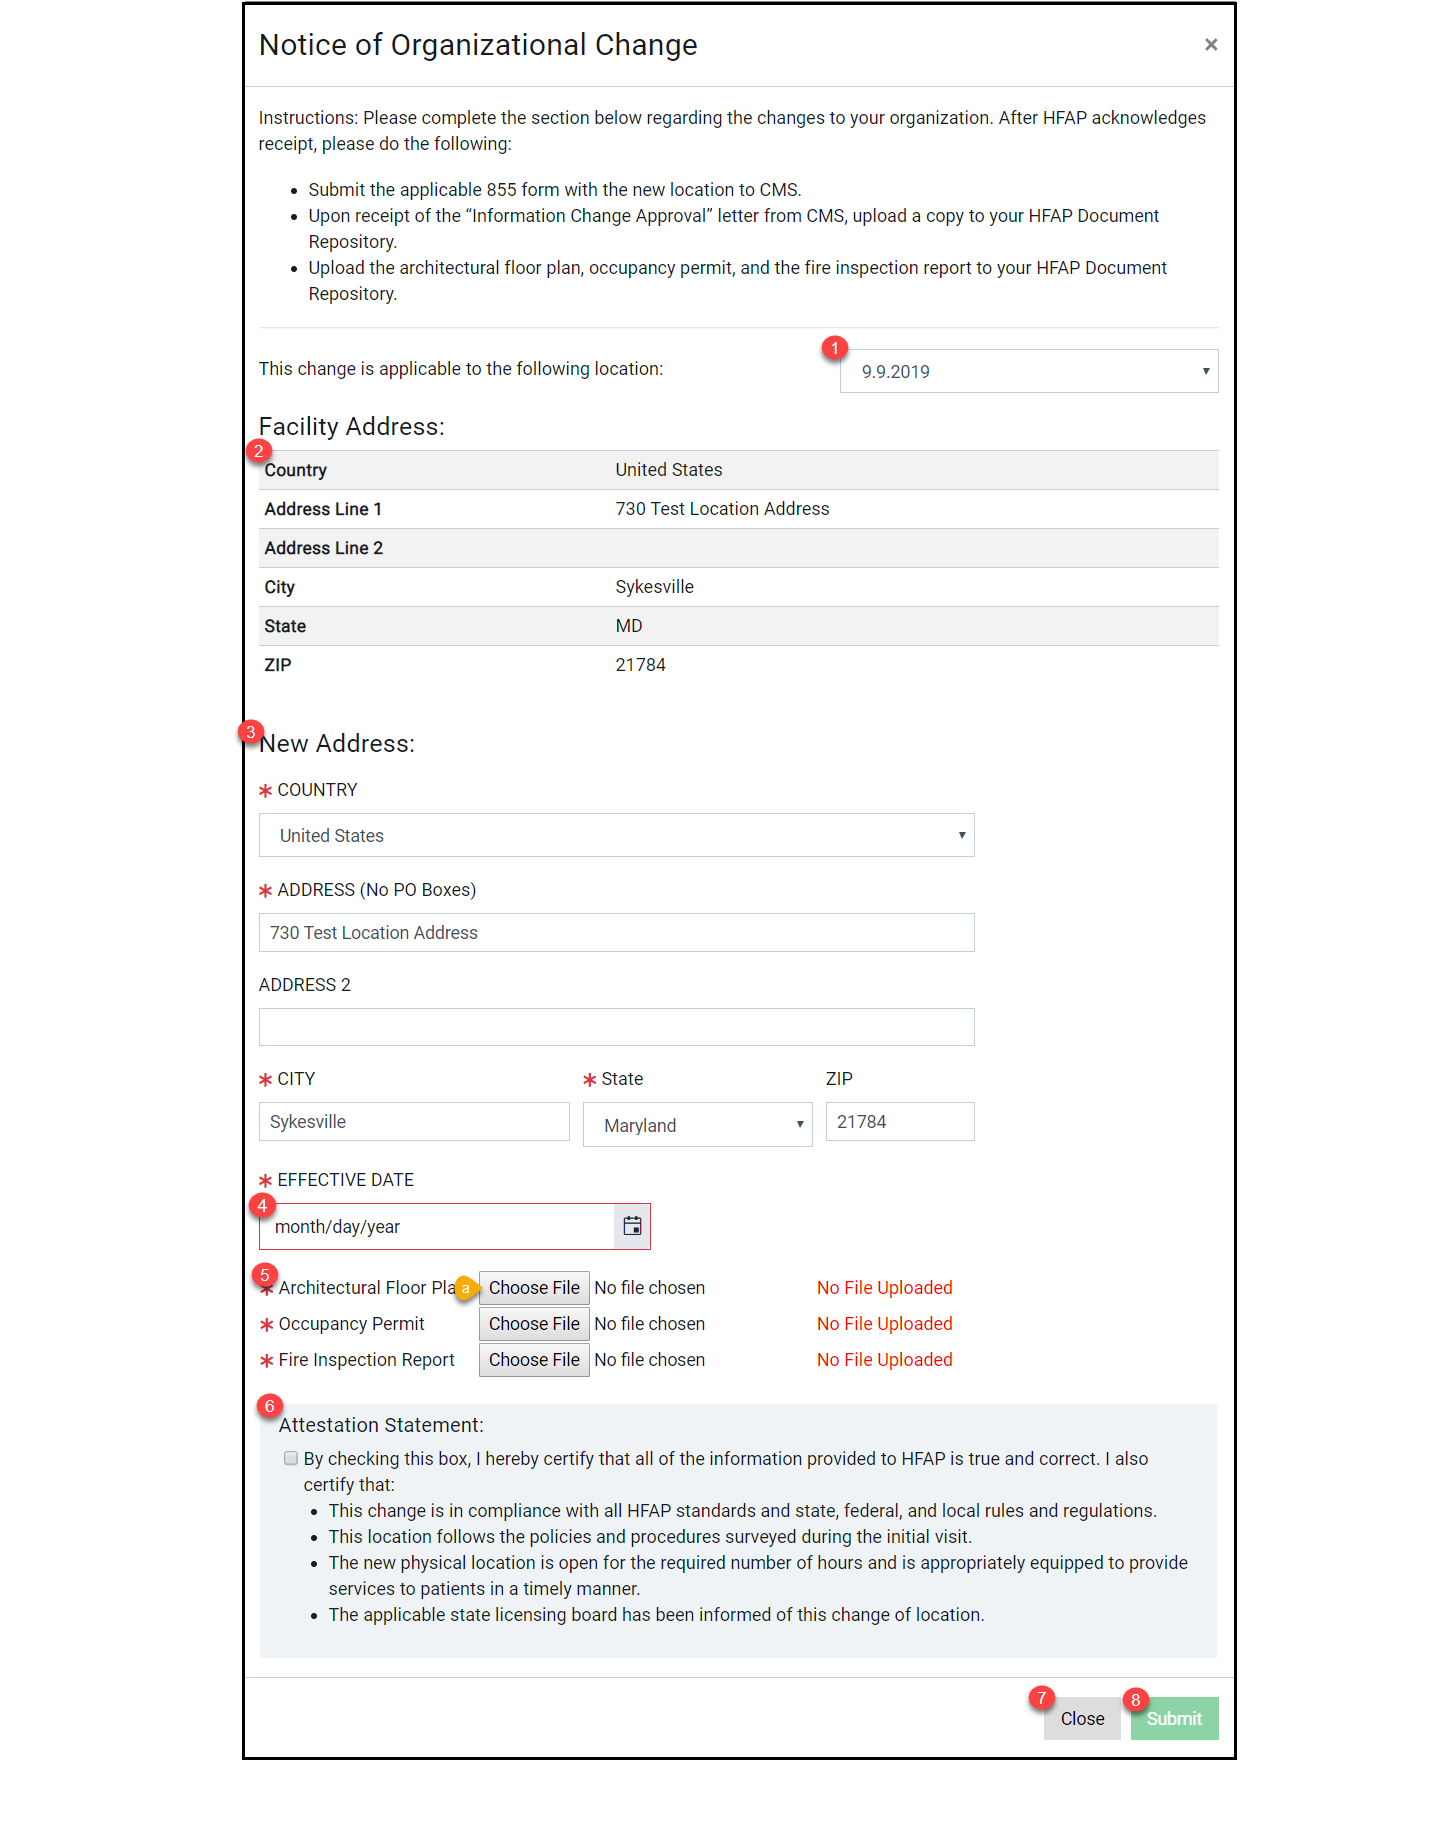
1. The change is applicable to the following location drop down menu will allow you to select the location that you are changing ownership for.
2. The Facility Address section is where you will see the organization’s current demographic information
3. The New Address section is where you will enter the new organization demographic information. This includes: country, street address, city, state, and postal code.
4. The Effective Date is when this ownership change takes effect.
5. These are the documents that are required to be submitted along with the change request form.
a. Click the Choose File button to select the file that will be uploaded.
6. The Attestation Statement is a required checkbox that you must check to certify that all of the information provided to HFAP is true and correct.
7. The Close button will close the pop-up window without saving the entered information.
8. The Submit button will save all information entered and submit the change request to HFAP for approval. You will not be able to submit your request until all required information has been entered.
Contacts
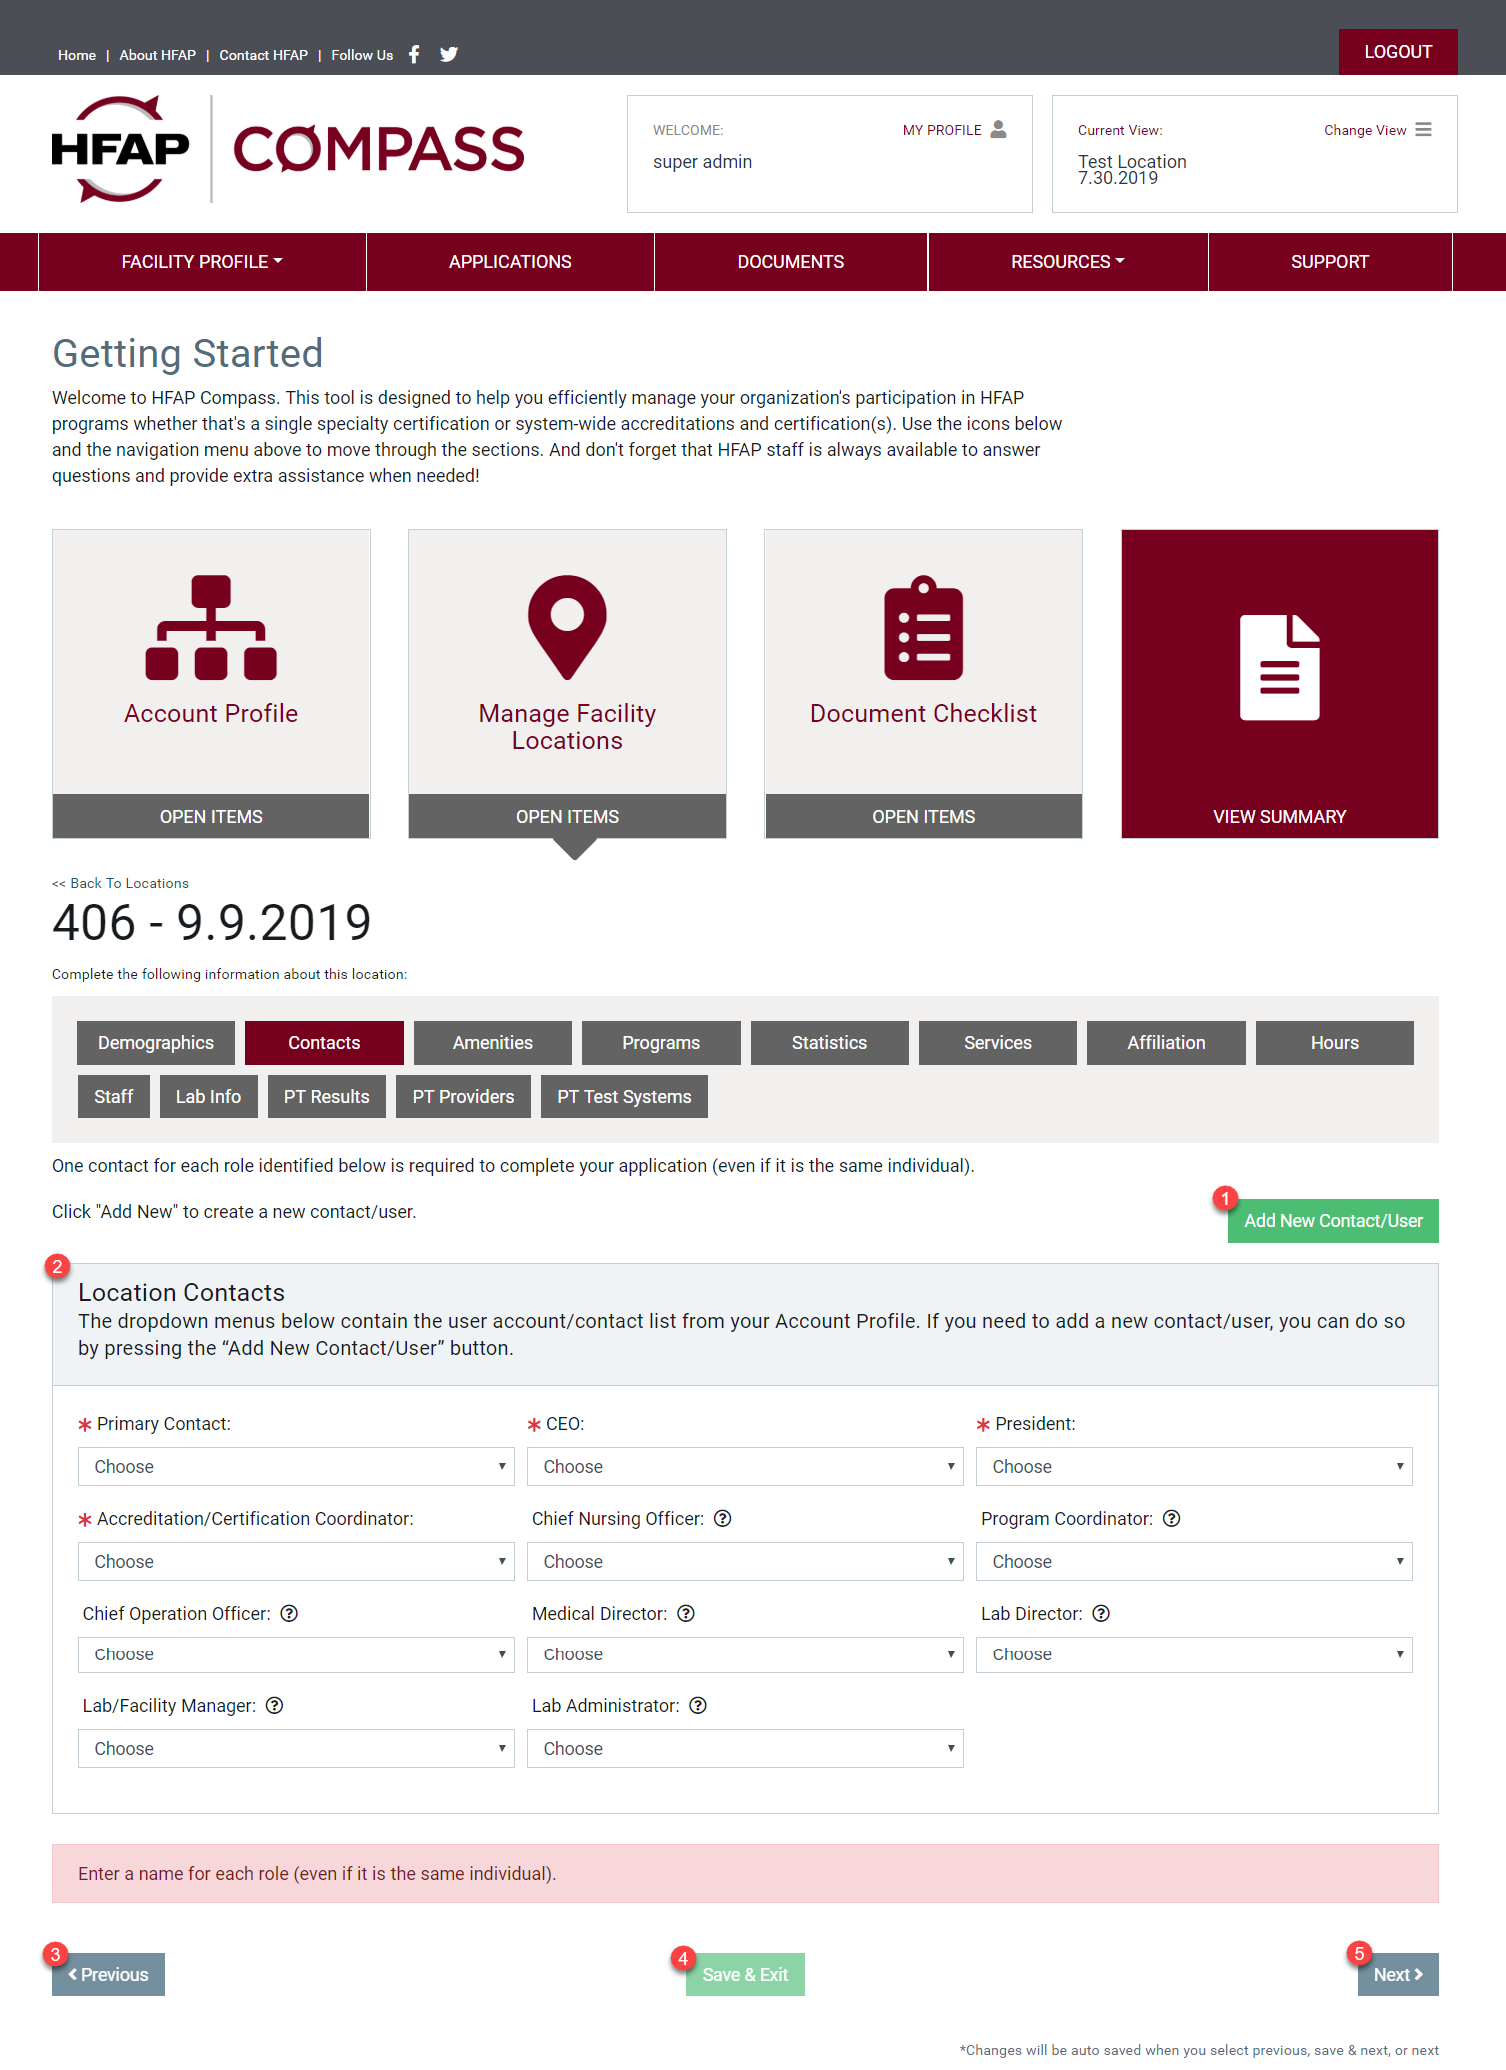
1. The Add New Contact/User button will allow you to quickly add a new contact/user to this list.
2. The Location Contacts section is where you will select a user for each type of contact, including: primary contact, CEO, president, accreditation/certification coordinator, chief nursing officer, program coordinator, chief operation officer, medical director, lab director, lab/facility manager, and lab administrator. Some contacts are required to move on to the next section.
3. The Previous button will save all information entered and take you to the previous section, demographics.
4. The Save & Exit button will save all information entered and take you back to the Manage Facility Locations dashboard.
5. The Next button will save your information and take you to the next section, contacts.
Add User/Contact
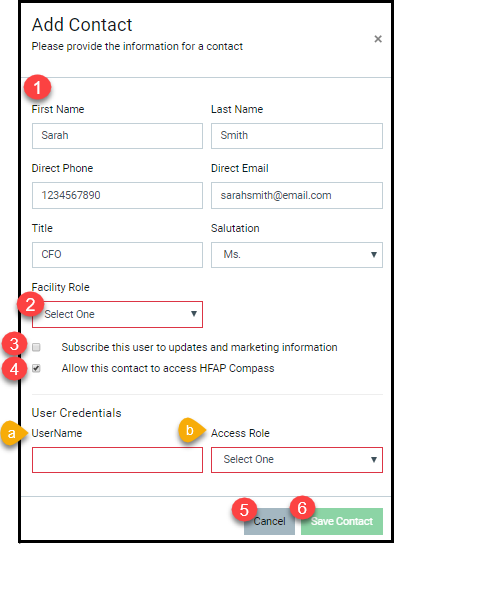
1. This section is where you will find the contact’s general information. This includes: first name, last name, direct phone number, direct email address, title. and salutation.
2. The Facility Role drop down menu is where you will select the contact’s role at the facility.
3. The Subscribe this user to updates and marketing information checkbox will send this user updates and marketing information.
4. The Allow this contact to access HFAP Compass checkbox will give this user access to the HFAP compass portal. Once this box is checked, the User Credentials section will appear.
a. The Username field is where you will enter the username that the contact will use to login to HFAP Compass.
b. The Access Role drop down menu is where you will select the role for the user. This will determine the level of control the user has within HFAP Compass.
5. The Cancel button will close the pop-up window without saving the entered information.
6. The Save Contact button will save the entered information, and add the new contact to the Contacts table.
Amenities
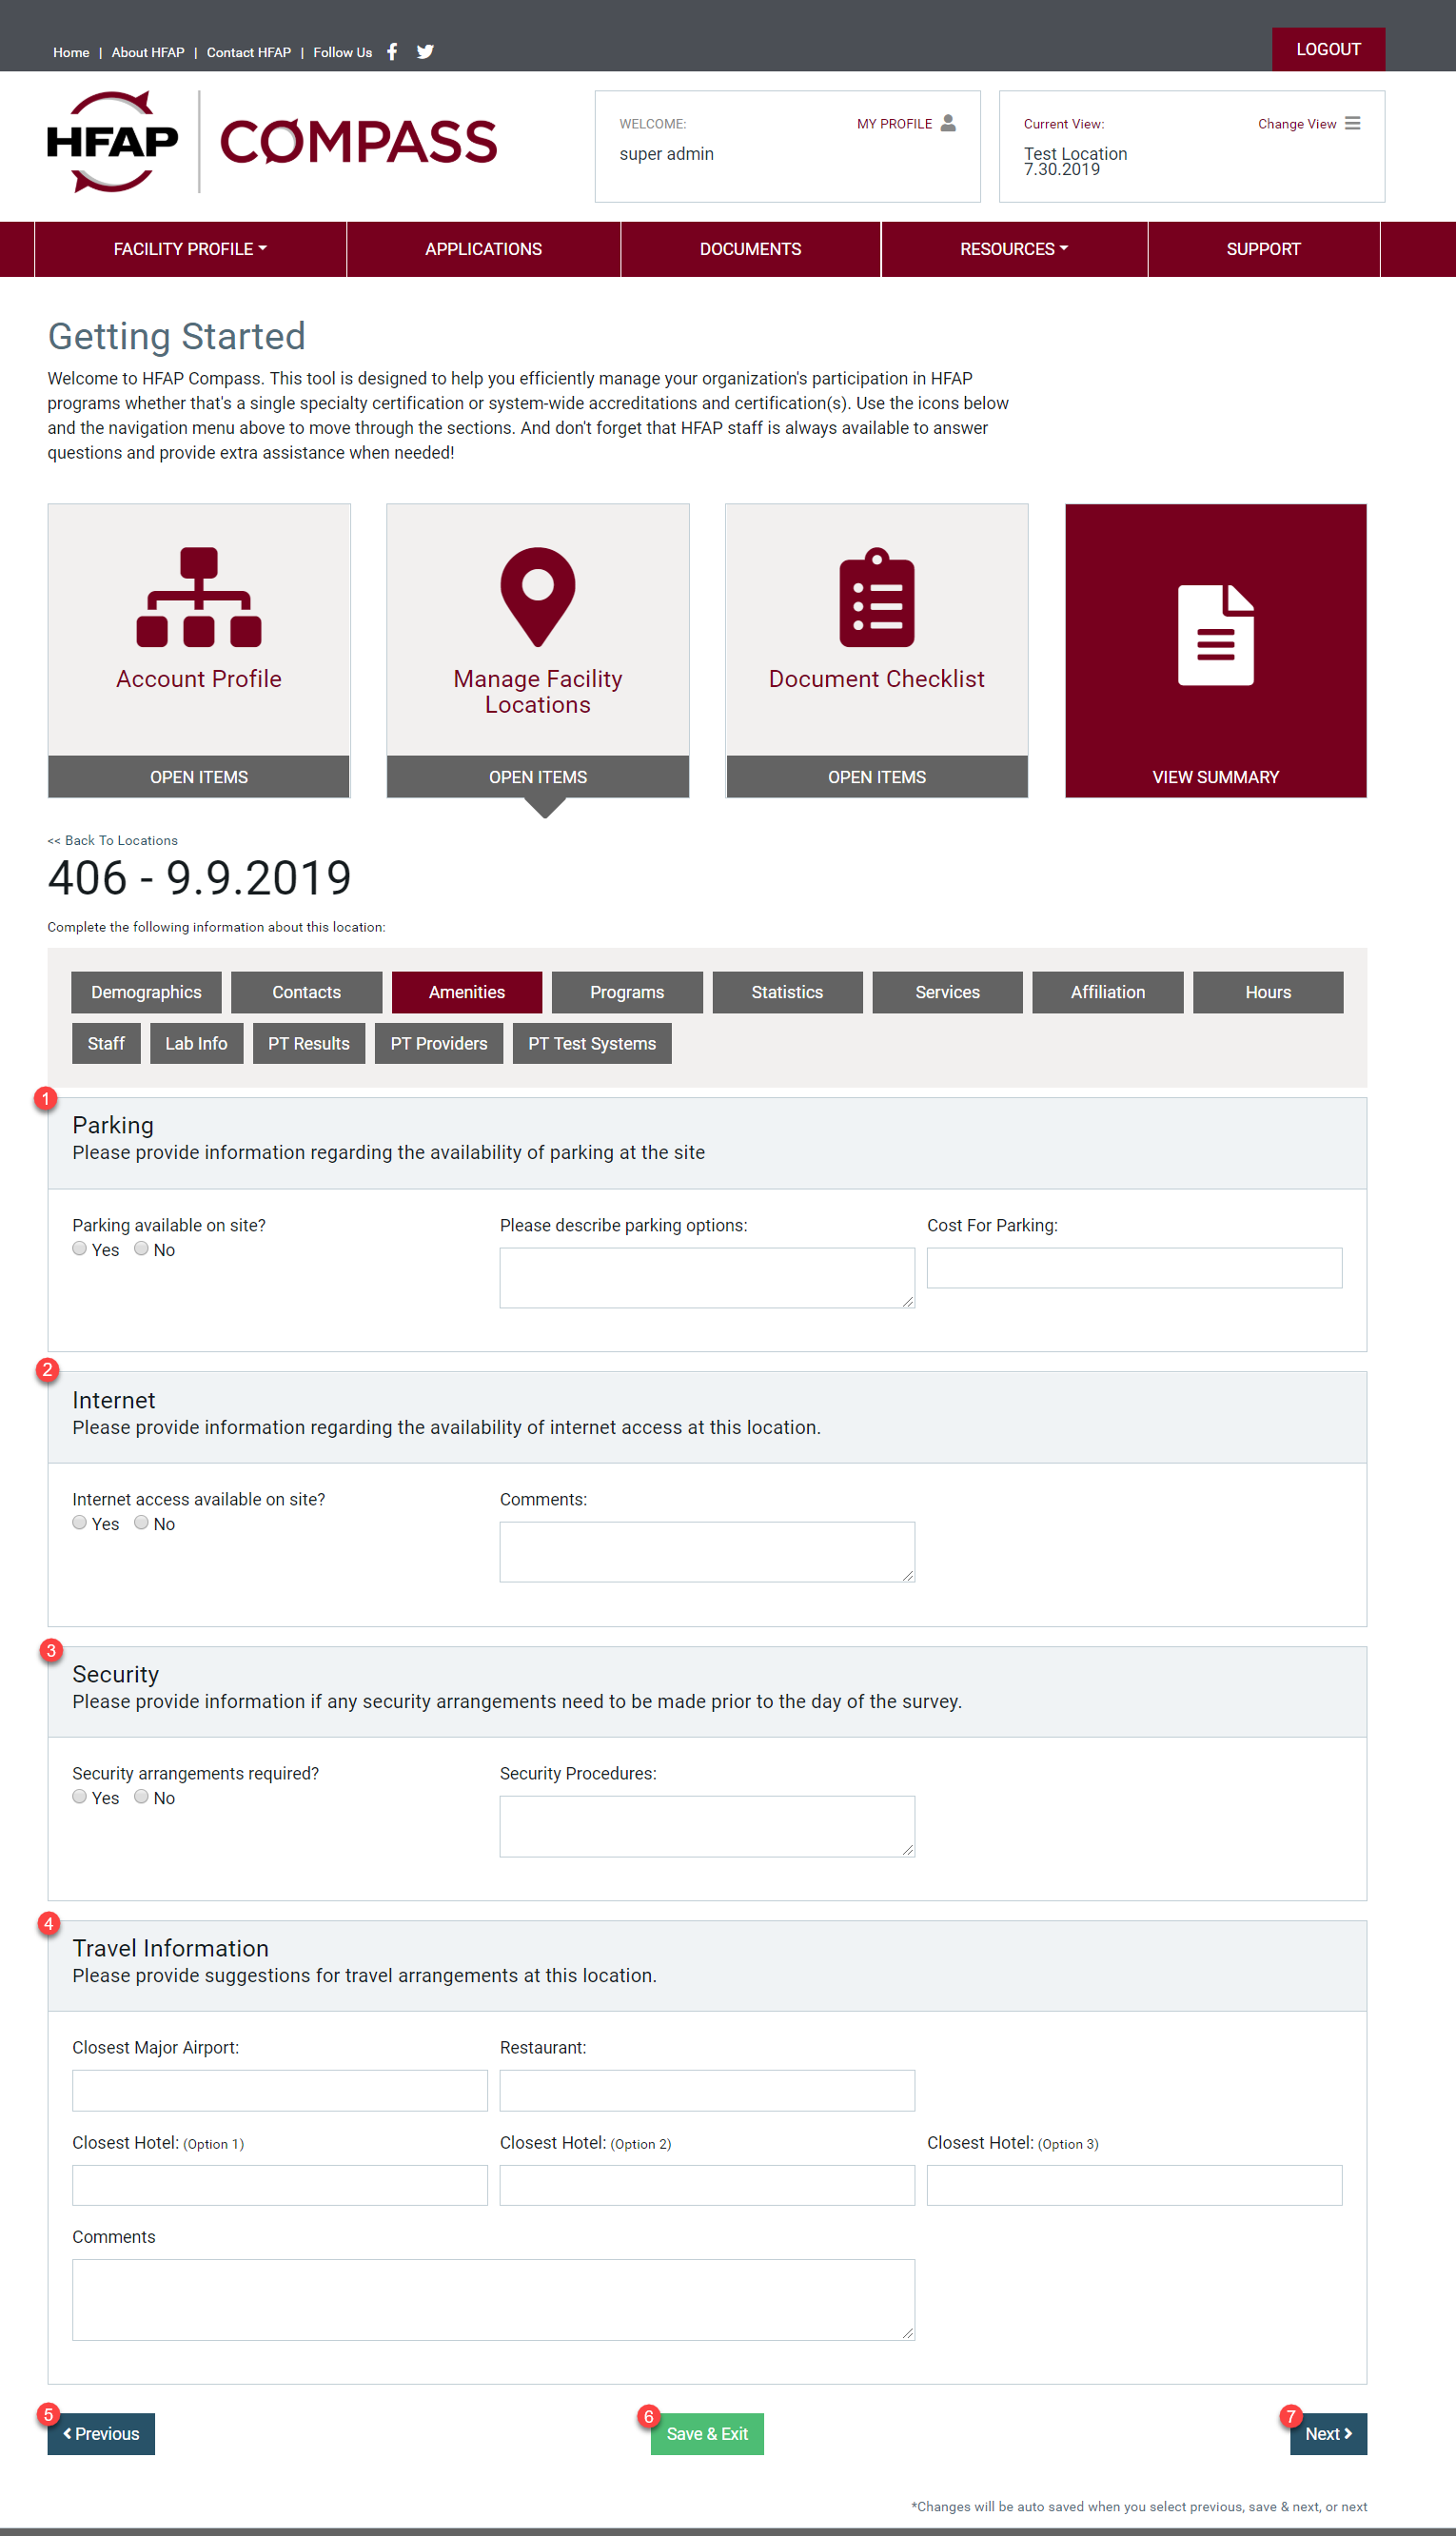
1. The Parking section is where you can enter any pertinent information regarding parking for a surveyor.
2. The Internet section is where you can enter any pertinent information regarding internet connection for a surveyor.
3. The Security section is where you can enter any pertinent information regarding security procedures for a surveyor.
4. The Travel Information section is where you can enter any pertinent information regarding travel for the surveyor. You can enter airport and hotel recommendations.
5. The Previous button will save all information entered and take you to the previous section, contacts.
6. The Save & Exit button will save all information entered and take you back to the Manage Facility Locations dashboard.
7. The Next button will save your information and take you to the next section, programs.
Programs
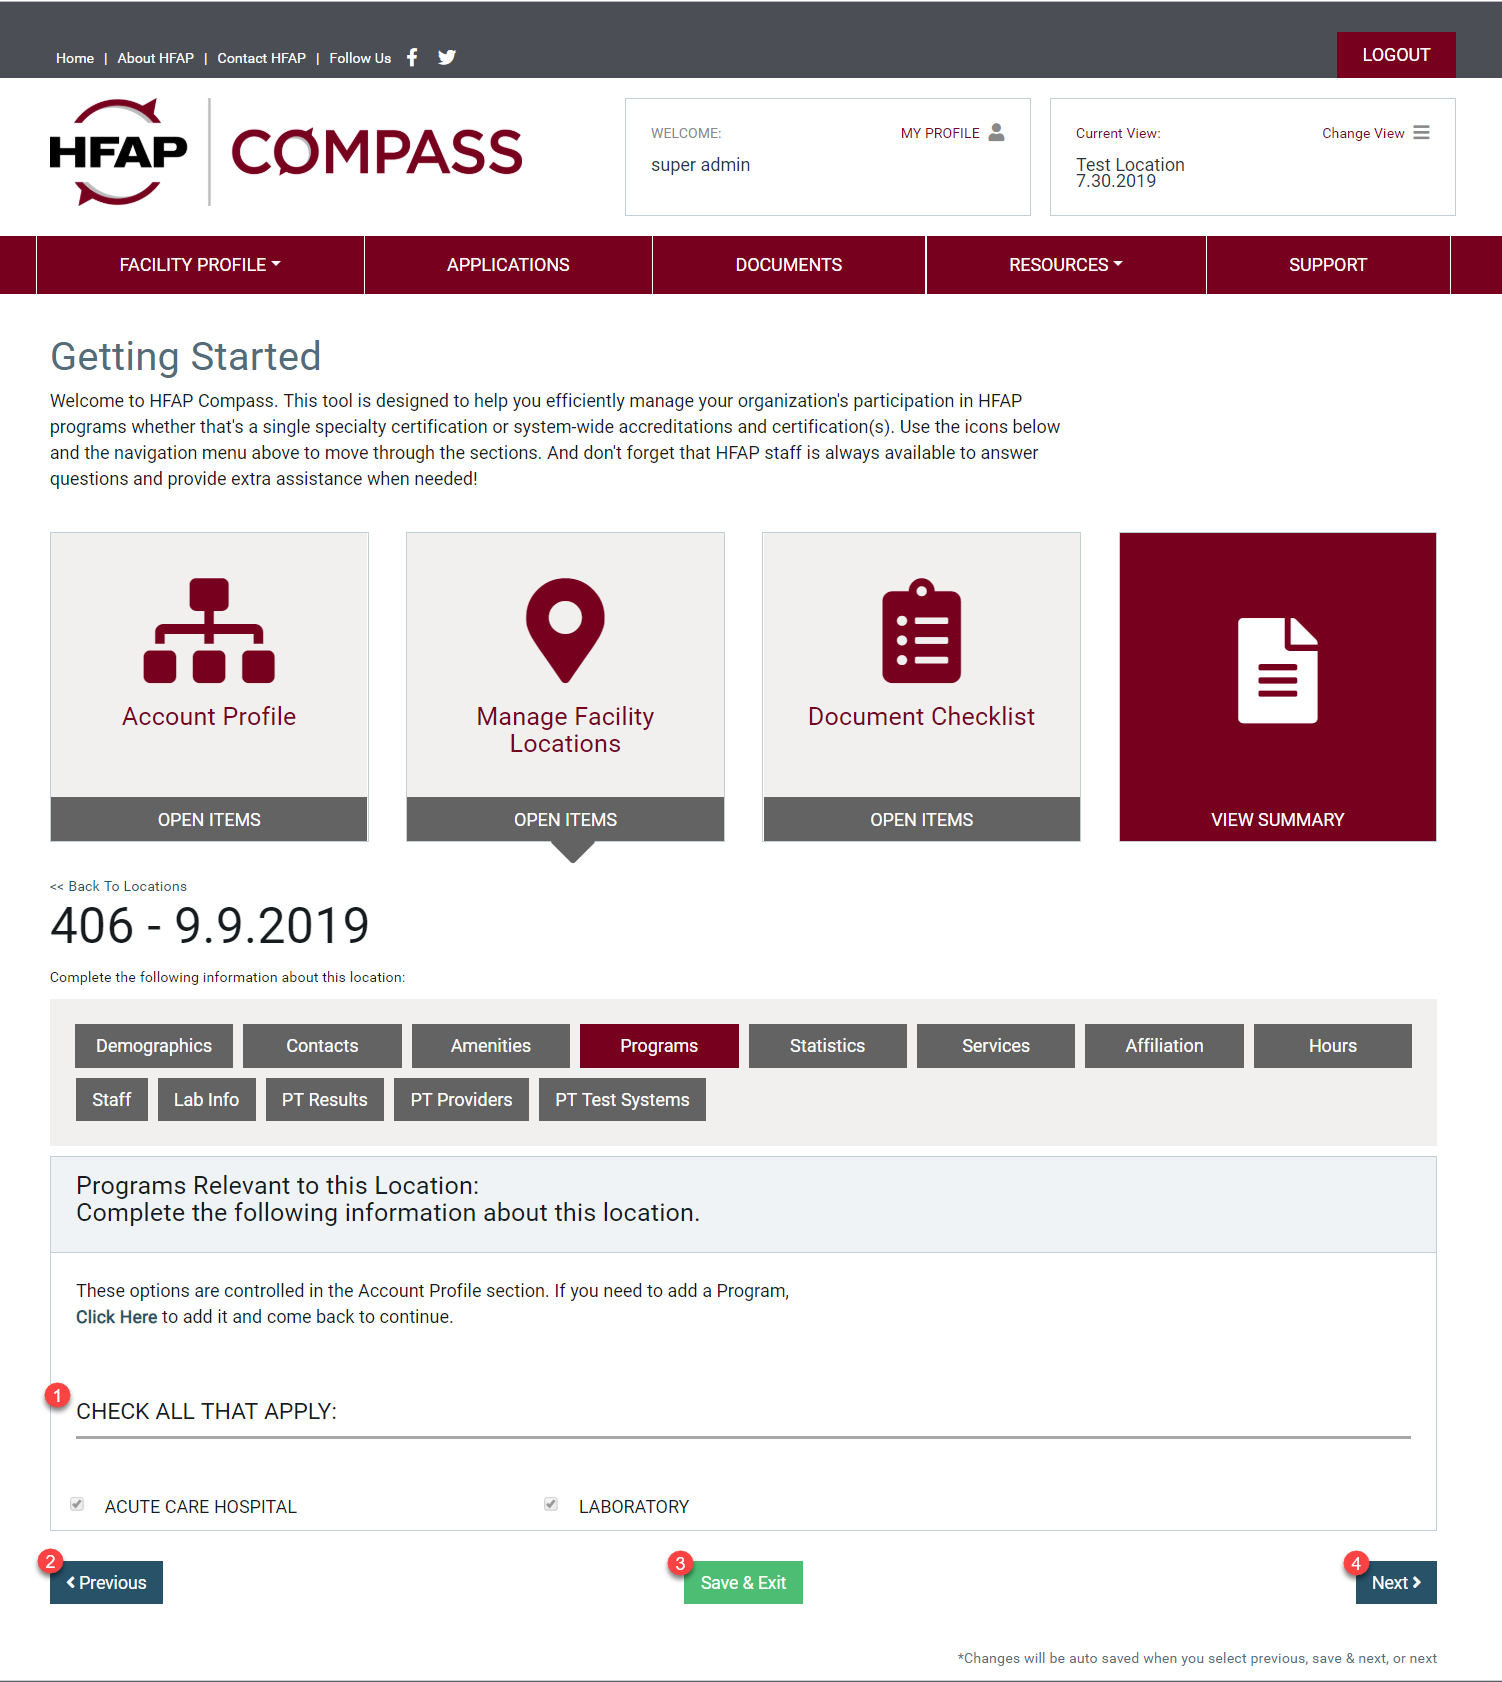
1. The Programs section is where the location will select the program they are providing at that specific location. All programs must first be selected under the Account profile section and then specified which program is being relevant to this particular location. Click the checkbox next to the program, or programs, your location provides.
2. The Previous button will save all information entered and take you to the previous section, amenities.
3. The Save & Exit button will save all information entered and take you back to the Manage Facility Locations dashboard.
4. The Next button will save your information and take you to the next section, statistics.
Statistics
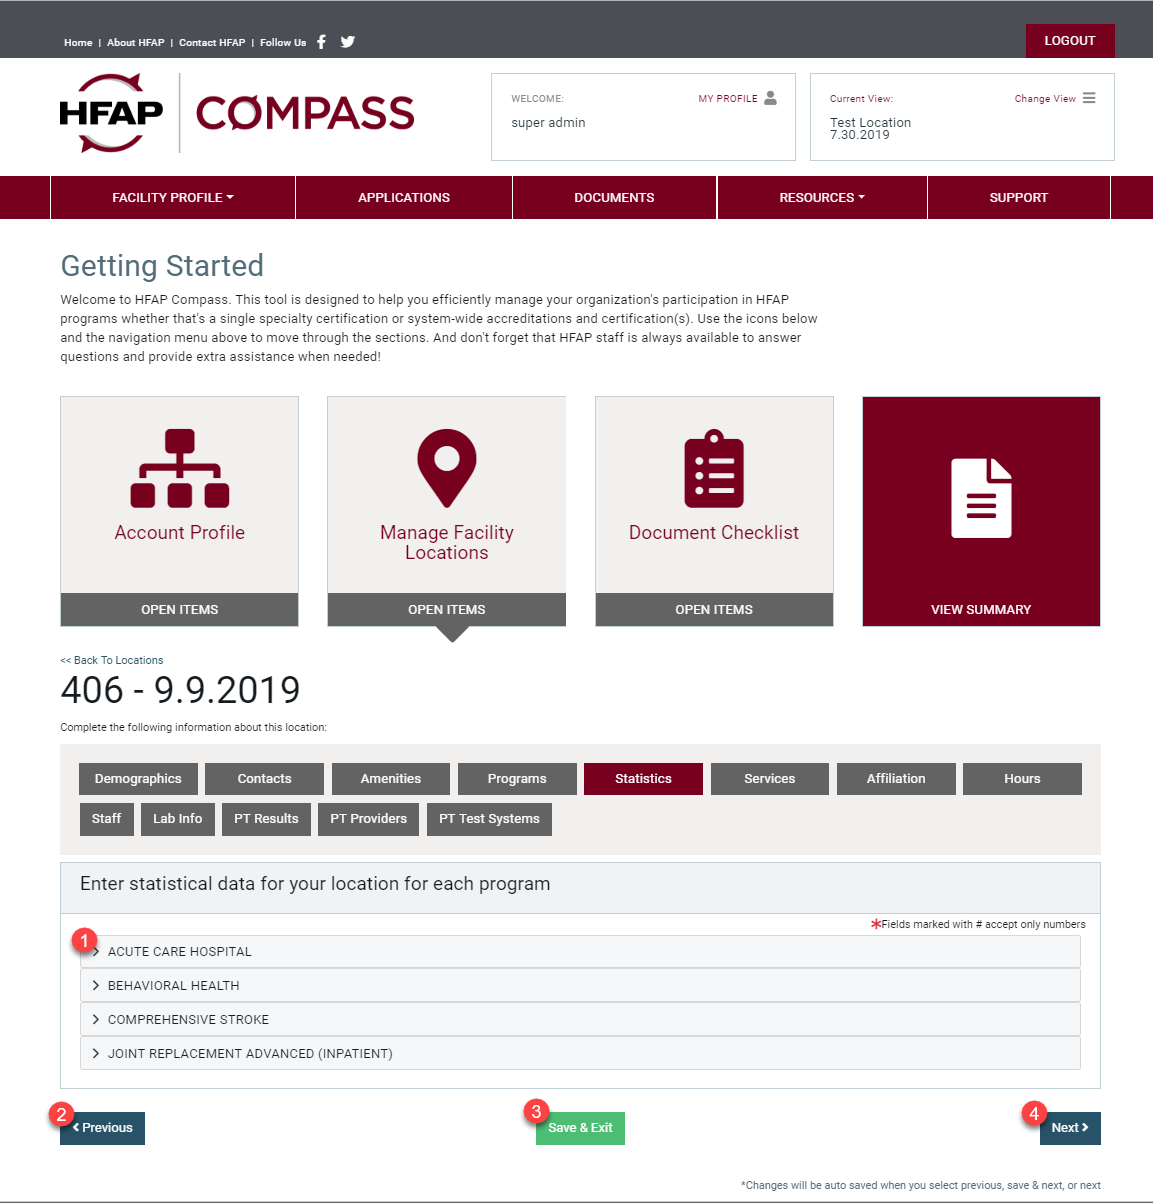
The Statics section is where your location will manage important statistical data that is required by HFAP.
1.Different programs will have different statistic data required. Each program will have its own accordion menu where you can enter statistical data per program. As you expand the accordion menus, you will enter all statistical data relevant to your location.
2. The Previous button will save all information entered and take you to the previous section, programs.
3. The Save & Exit button will save all information entered and take you back to the Manage Facility Locations dashboard.
4. The Next button will save your information and take you to the next section, services.
Services
The Services section is where your facility will select which services are being performed at that specific location.
1. Different programs will have different services offered. Each program will have its own accordion menu where you can enter the different services provided, per program. As you expand the accordion menus, you will check off which services your facility provides, and the start and end date for each.
2. The Previous button will save all information entered and take you to the previous section, statistics.
3. The Save & Exit button will save all information entered and take you back to the Manage Facility Locations dashboard.
4. The Next button will save your information and take you to the next section, affiliation.
Affiliation
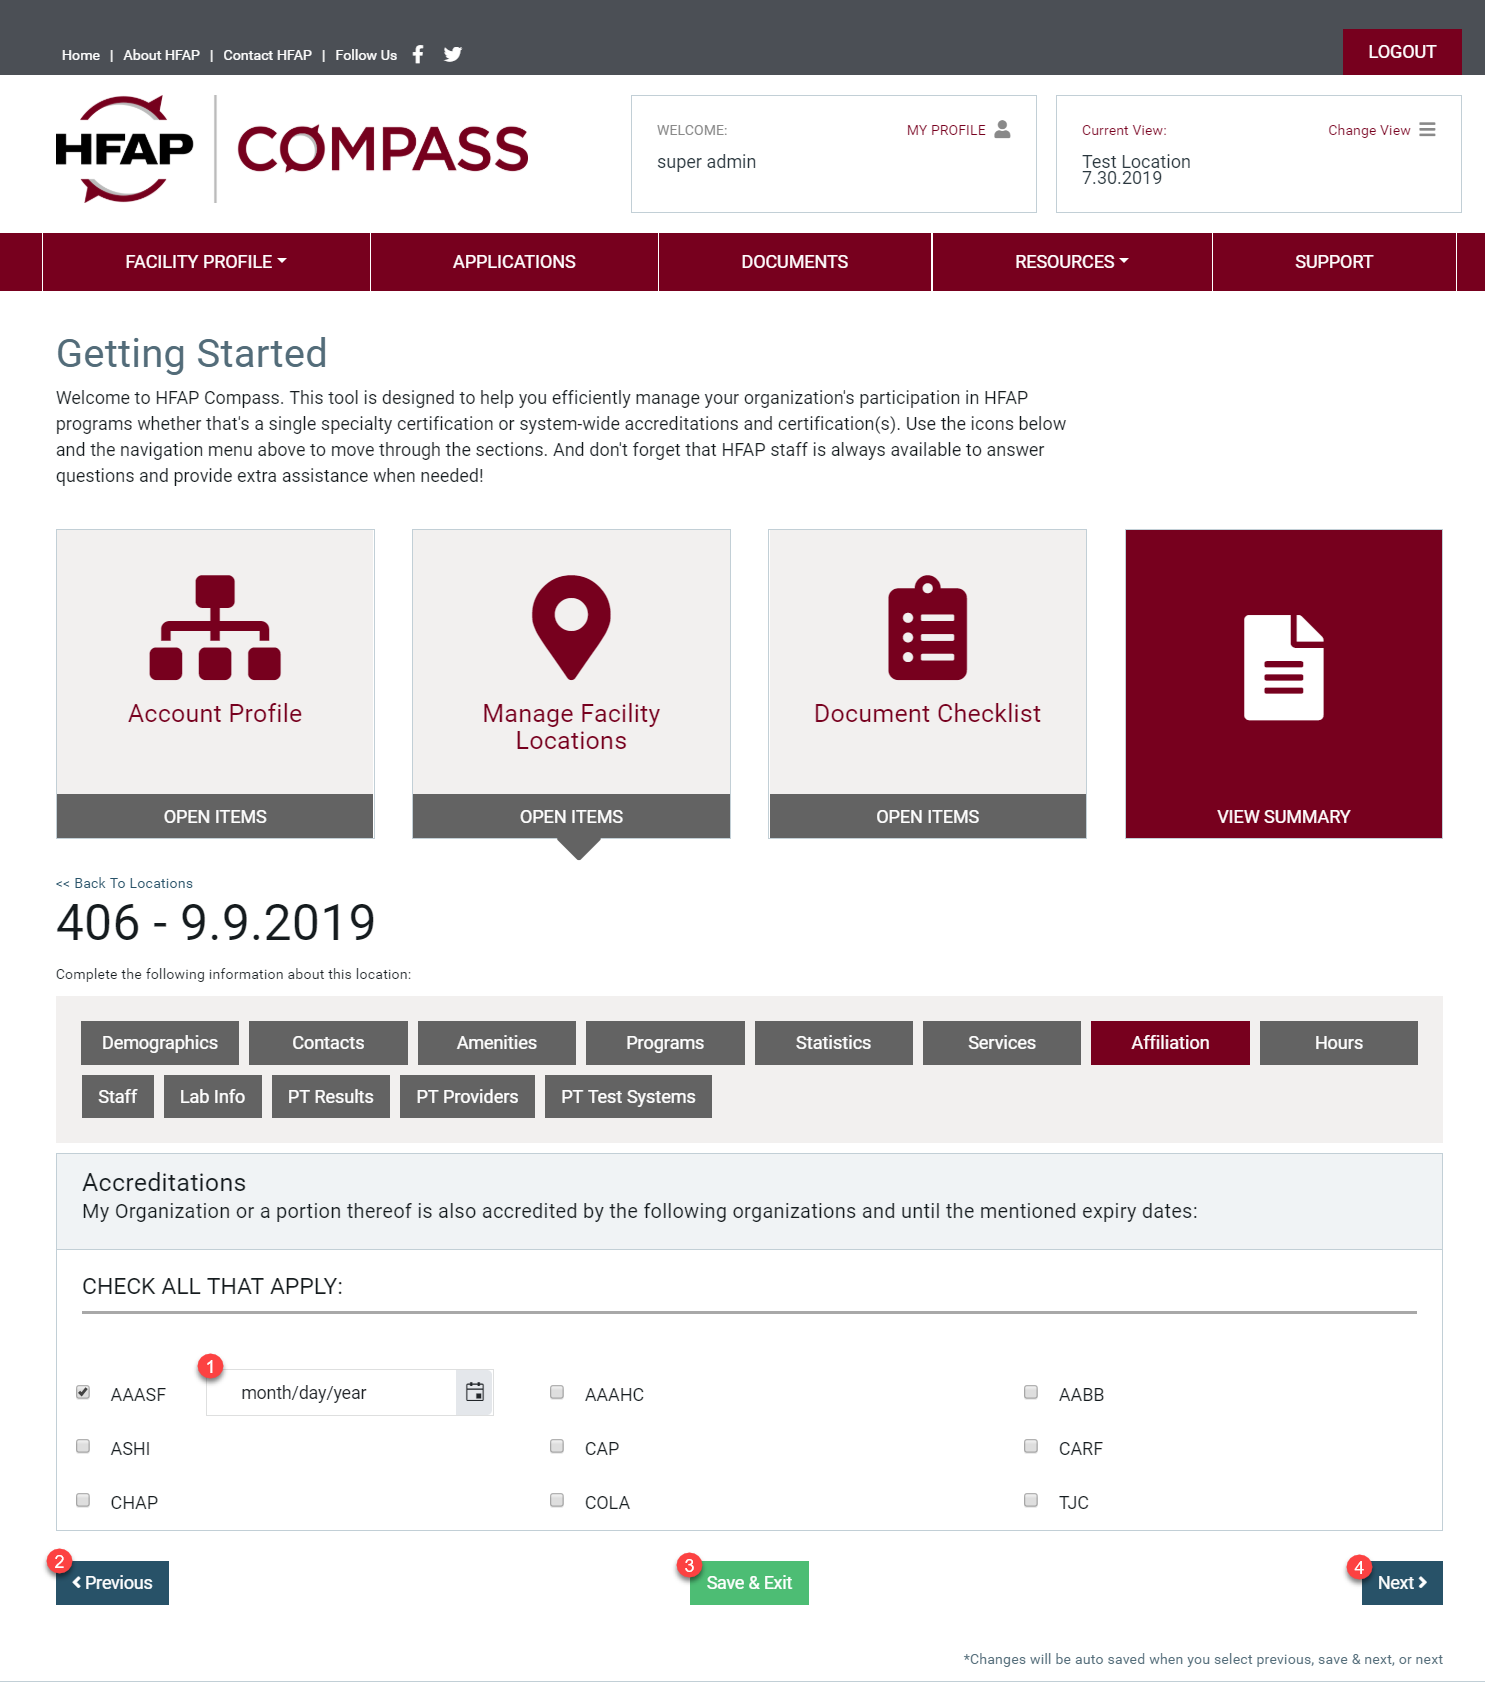
The Affiliation section is where your facility will provide HFAP with information regarding any other accrediting body that your location is associated with.
1. As you check off the accrediting organization(s), you will be required to enter the expiration date for that organization.
2. The Previous button will save all information entered and take you to the previous section, services.
3. The Save & Exit button will save all information entered and take you back to the Manage Facility Locations dashboard.
4. The Next button will save your information and take you to the next section, hours.
Hours
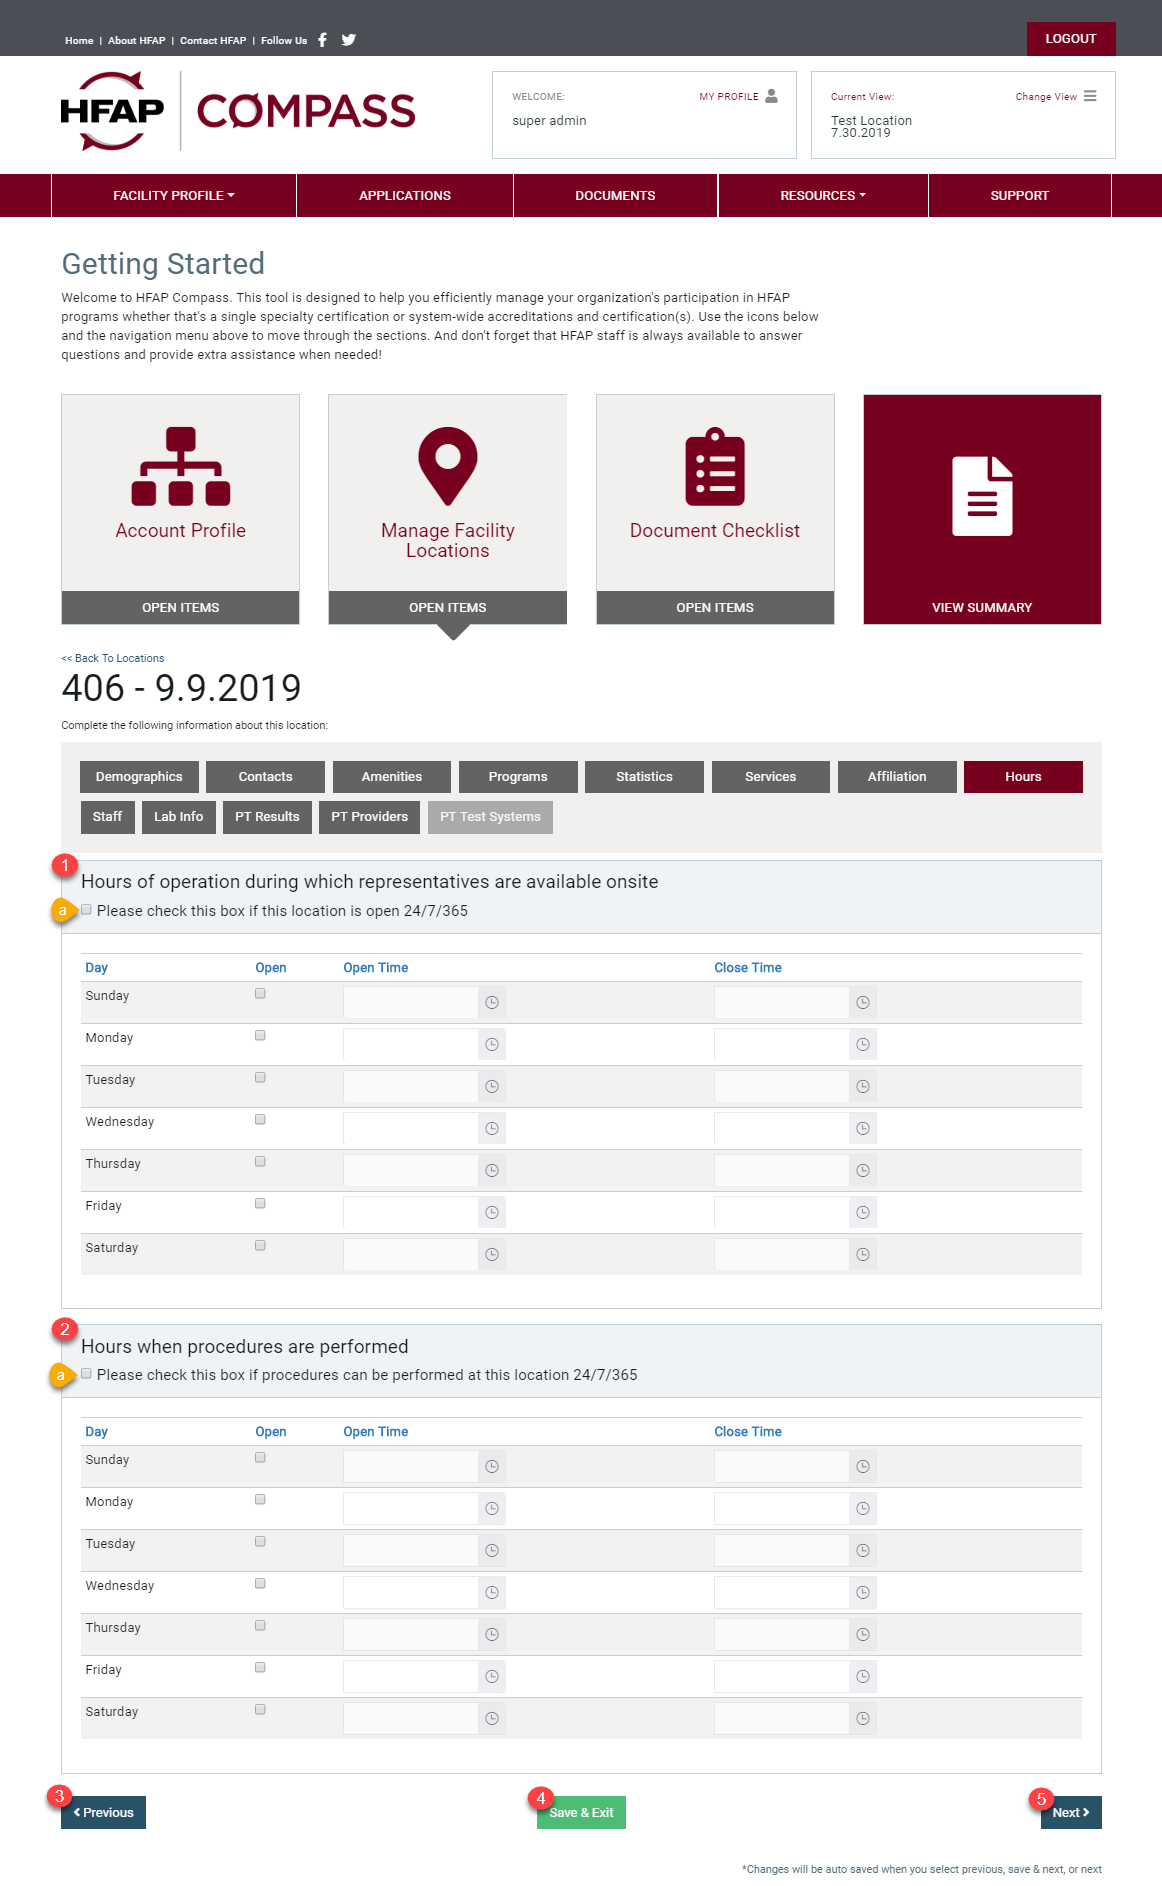
The Hours section within the Manage Facility Locations is used to manage your location’s hours.
1. The Hours of Operation section is where your location can specify the hours in which representatives will be onsite for a survey. HFAP will use this information when scheduling your location for a survey.
a. Check this box to indicate if this particular location is open 24/7.
2. The Hours when Procedures are Performed section is where your location can specify the hours in which procedures are performed so HFAP can schedule the survey to take place during those hours. This section will only be visible to program in which a survey needs to take place during a procedure.
3. The Previous button will save all information entered and take you to the previous section, affiliation.
4. The Save & Exit button will save all information entered and take you back to the Manage Facility Locations dashboard.
5. The Next button will save your information and take you to the next section, staff.
Staff
The Staff section within Manage Facility Locations is used to manage Laboratory Staff. This section will only be visible if Laboratory was a selected program for your location.
1. The Add Staff button will allow you to quickly add a new technical laboratory staff member.
2. The Staff table is where you will see a complete list of all technical laboratory staff at your location. This table includes: staff name, length of their service, the highest level of test complexity they can perform, and the shift they work. This table will allow you to filter by column.
3. The View/Edit button will open the staff pop-up window and allow you to make changes to a staff member within this list.
4. The Remove button will let you remove this contact from the list (your user permissions will define if you can do this or not).
5. The Previous button will save all information entered and take you to the previous section, hours.
6. The Exit button will save all information entered and take you back to the Manage Facility Locations dashboard.
7. The Next button will save your information and take you to the next section, lab info.
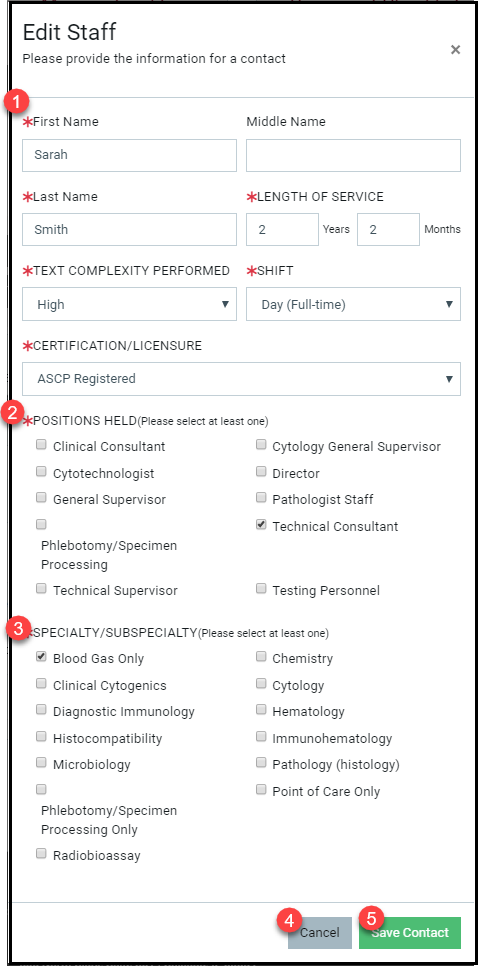
Add Staff
1. This section is where you will find the staff member’s general information. This includes: first name, middle name, last name, length of service, text complexity performed, shift, and certification/licensure.
2. Positions Held section is where you will check off which position the staff member holds at the laboratory.
3. The Specialty/Subspecialty section is where you will check off which specialty, or specialties, the staff member is qualified in.
4. The Cancel button will close the pop-up window without saving the entered information.
5. The Save Contact button will save the entered information, and add the new contact to the lab staff table.
Lab Info
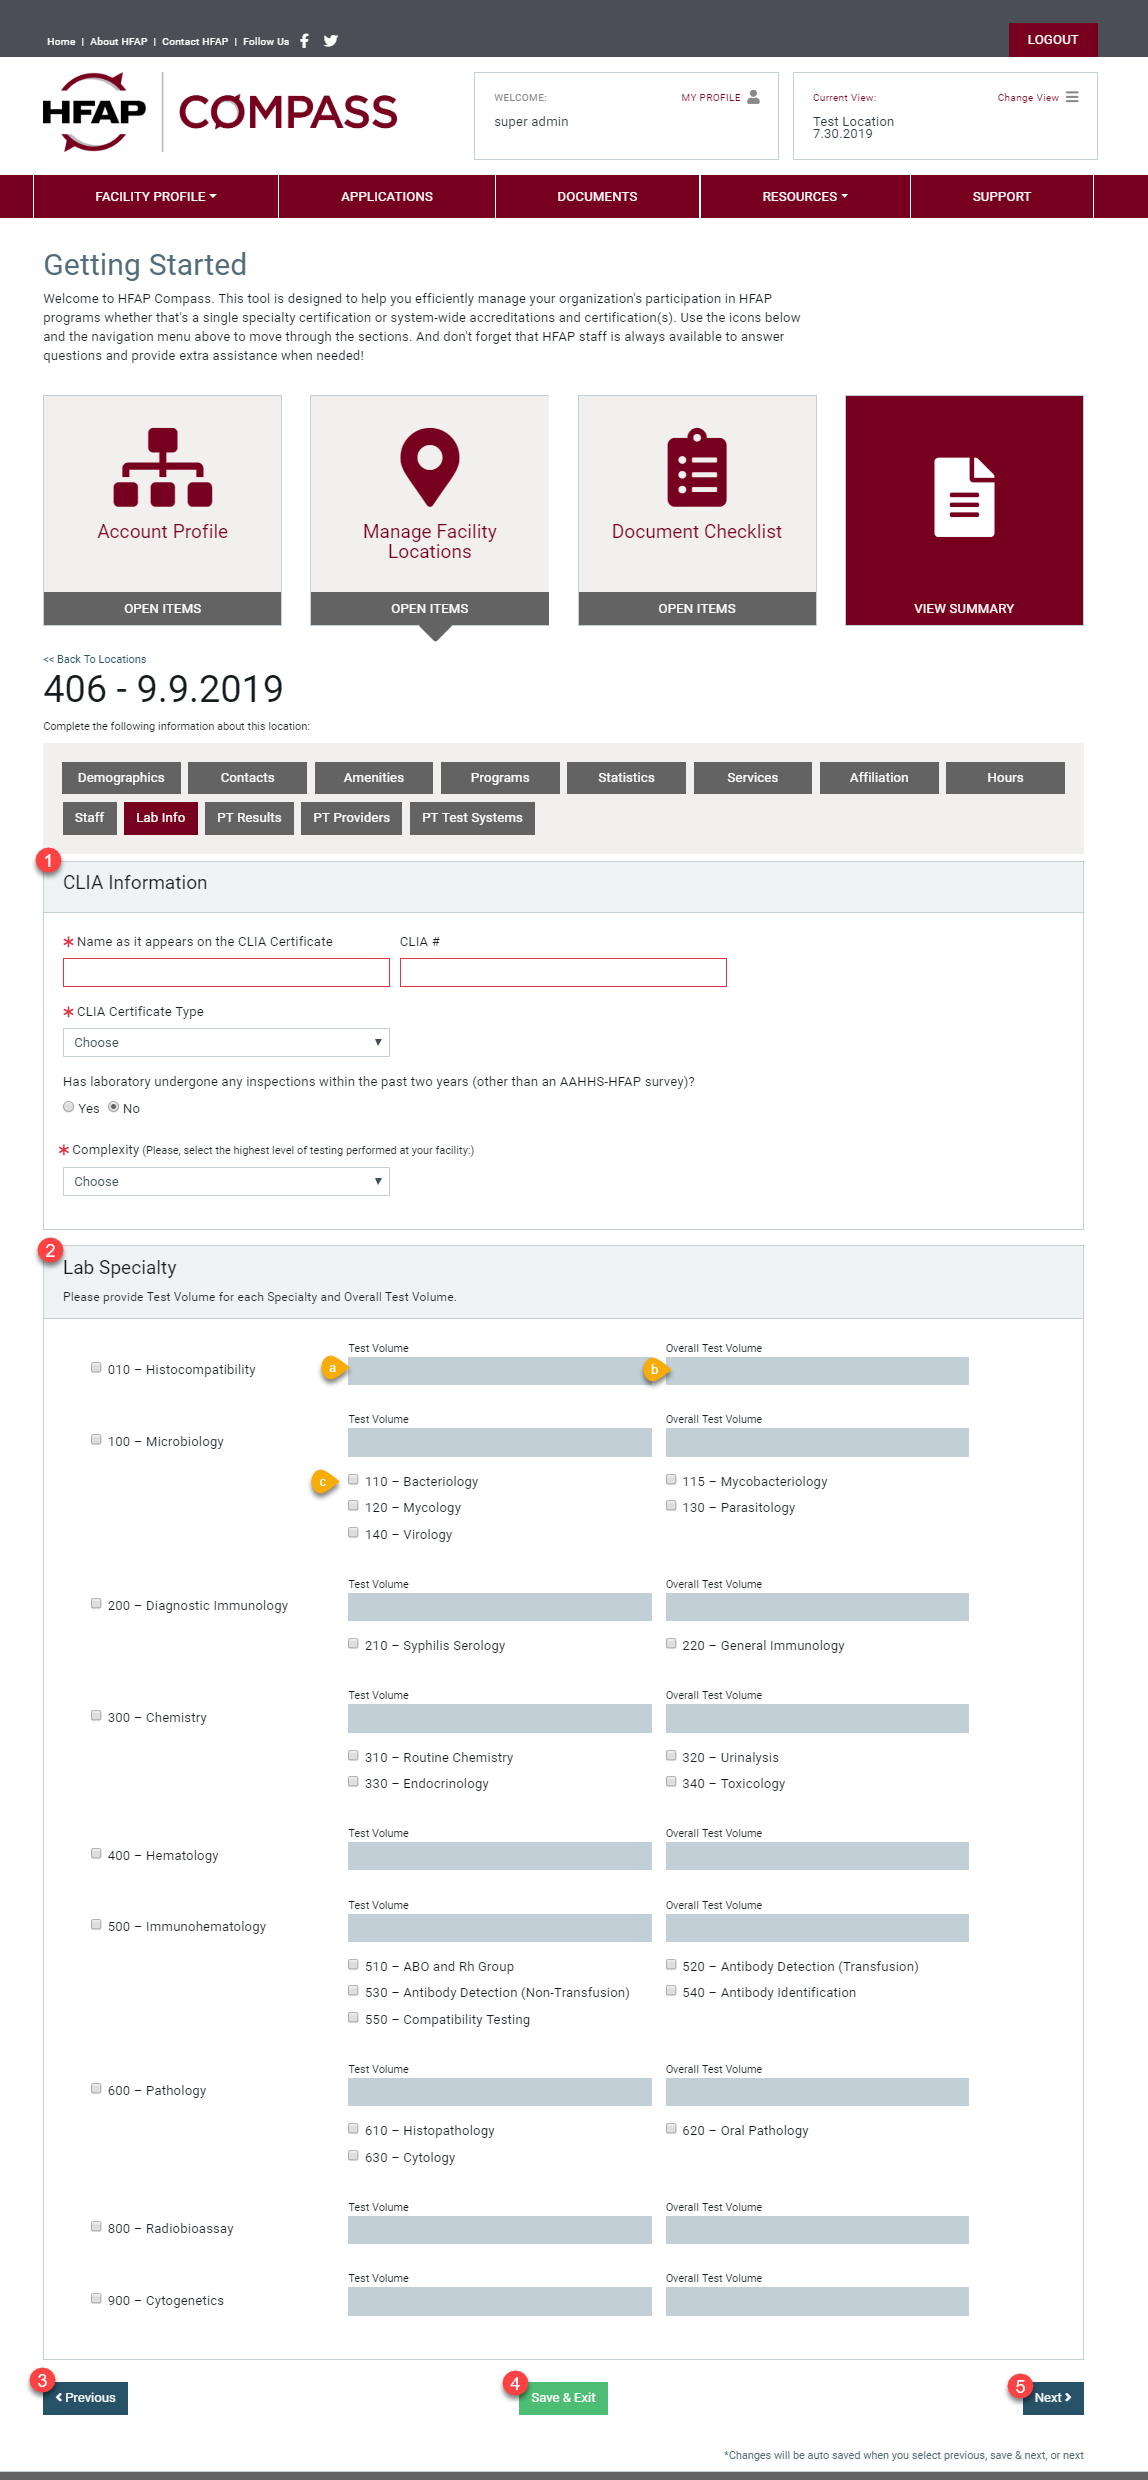
The Lab Info section within Manage Facility Locations is used to manage laboratory information. This section will only be visible if Laboratory was a selected program for your location.
1. The CLIA Information section is where you will enter your location’s CLIA information. This includes: the name on the CLIA certificate, your location’s CLIA number, the CLIA certificate type, and the complexity.
2. The Lab Specialty section is where your you will select which specialties your laboratory provides at that location.
a. This is where you will enter the test volume for the specialty.
b. This is where you will enter the overall test volume for the specialty.
c. This is where you will select and subspecialties your laboratory provides.
3. The Previous button will save all information entered and take you back to the previous section, staff.
4. The Save & Exit button will save all information entered and take you back to the Manage Facility Locations dashboard.
5. The Next button will save your information and take you to the next section, PT results.
PT Providers
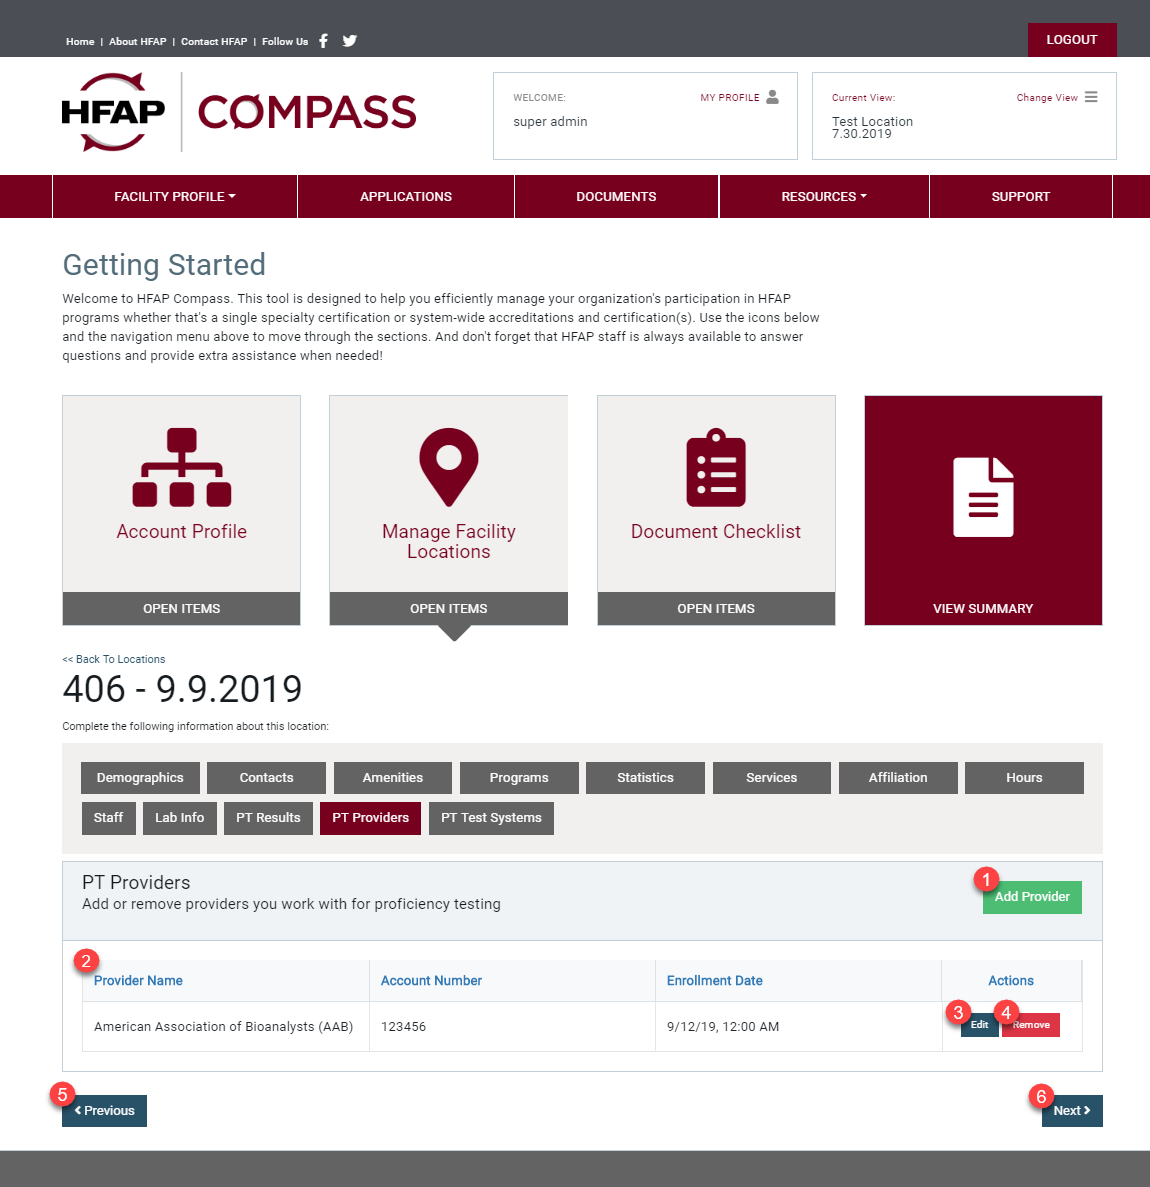
The PT Providers section within Manage Facility Locations is used to manage the PT providers for your laboratory. This section will only be visible if Laboratory was a selected program for your location.
1. The Add Provider button will allow you to quickly add a proficiency testing provider.
2. The provider table will display all current proficiency providers for all your location. Displayed in the table will be: the provider name, account number, and enrollment date.
3. The Edit button will open the staff pop-up window and allow you to make changes to a PT provider within this list.
4. The Remove button will let you remove this contact from the list.
5. The Previous button will save all information entered and take you back to the previous section, PT results.
6. The Next button will save your information and take you to the next section, PT test systems.
Add Provider
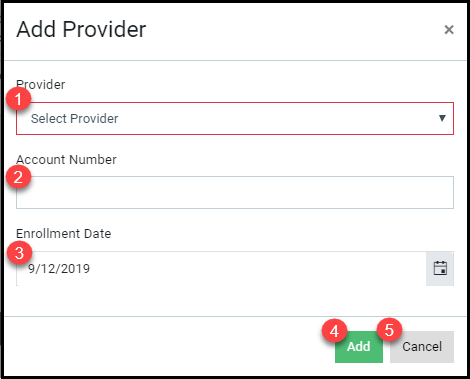
1. The Provider drop down menu is where you select a CMS approved proficiency testing provider.
2. The Account Number field is where you will enter your account number with the specified PT provider.
3. The Enrollment date is when you were enrolled with the specified PT provider.
4. The Add button will save the information entered and add the new provider to the PT providers table.
5. The Cancel button will close the pop-up window without saving any information entered.
PT Test Systems
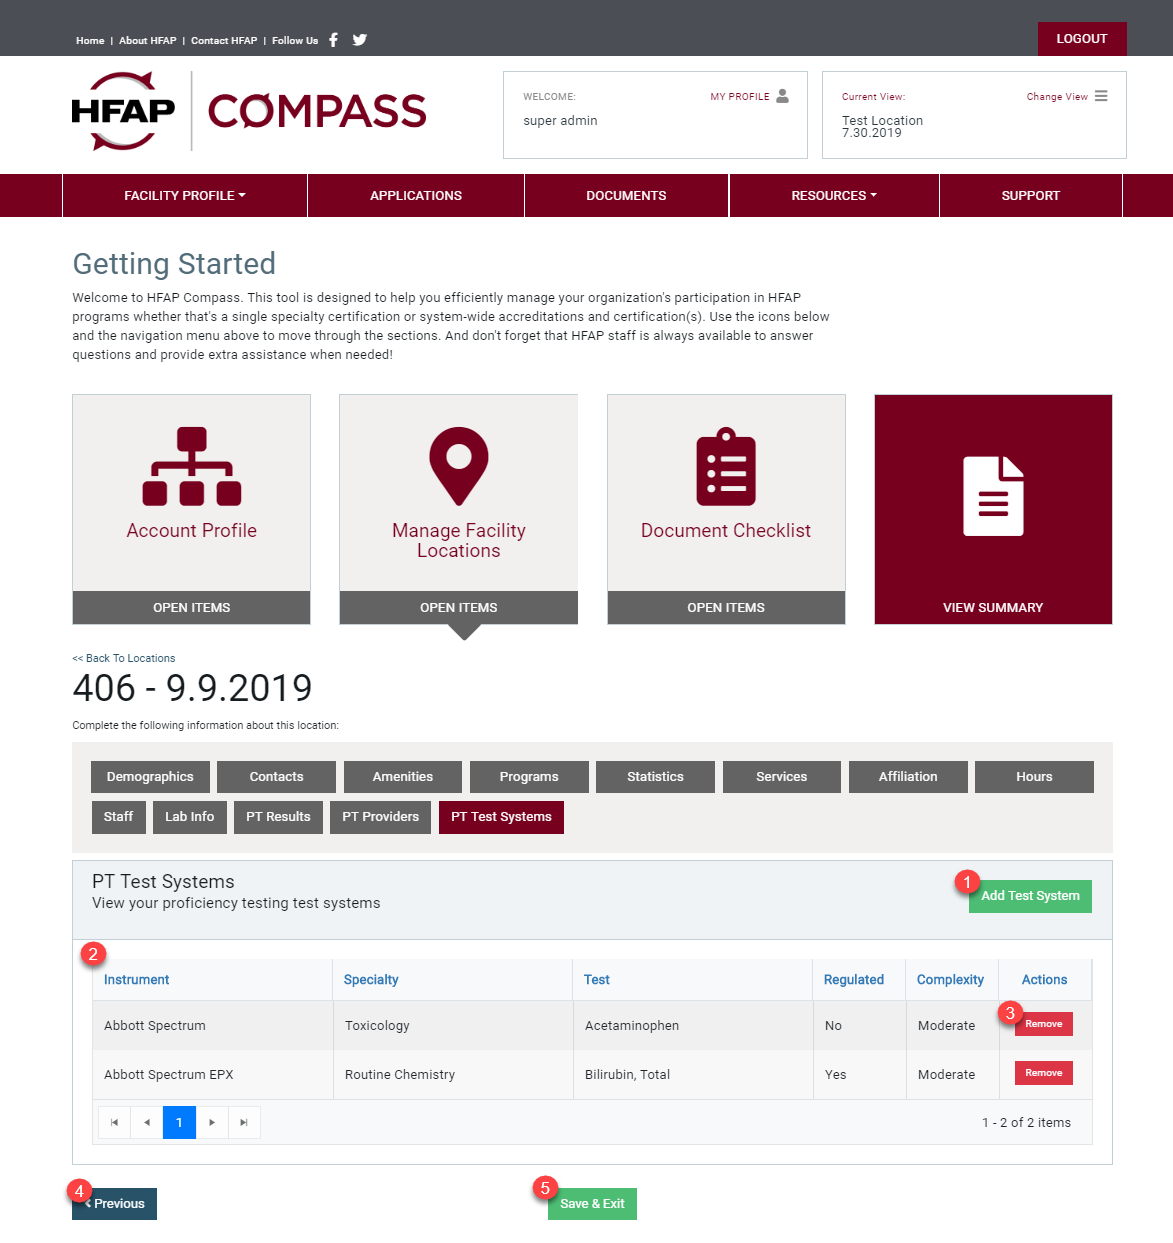
The PT Test Systems section within Manage Facility Locations is used to manage the the test systems that your laboratory runs. This section will only be visible if Laboratory was a selected program for your location.
1. The Add Test System button will allow you to tests to your test menu.
2. The tests table will display all current test systems performed at your location. Displayed in the table will be: instrument, specialty, test, whether it is a regulated test or not, and complexity.
3. The Remove button will let you remove this test from the list.
4. The Previous button will save all information entered and take you back to the previous section, PT providers.
5. The Save & Exit button will save all information entered and take you back to the Manage Facility Locations dashboard.
Add Test System – Step 1
1. Step 1 – Search is where you will search for the Manufacture and/or Model Name/Method.
2. The Cancel button will close the pop-up window without saving information.
3. To find a test that is not currently listed, click the Manual Request button to manually enter the test you are searching for. Include the manufacturer, model, instrument, and test name.
4. The Next Step button will take you to the next step in adding a test, selecting an instrument.
Add Test System – Step 2
1. Step 2 – Search Results is where you will select the Instrument name for the test you want to add. You will check off the box next to the instrument you want to add. The instrument table also includes: specialty name and qualifier name. With this table, you will be able to filter by column.
2. The Previous button will take you back to step 1.
3. To find a test that is not currently listed, click the Manual Request button to manually enter the test you are searching for. Include the manufacturer, model, instrument, and test name.
4. The Next Step button will take you to the next step in adding a test, selecting an instrument.
Add Test System – Step 3
1. Step 3 – Select Test Systems to Add page is where you will select all the tests you want to add. You will check off the box next to the test(s) you want to add to your test menu. The tests table also includes: complexity, qualifier one name, and qualifier two name.
2. The Previous Step button will take you back to step 2.
3. To find a test that is not currently listed, click the Manual Request button to manually enter the test you are searching for. Include the manufacturer, model, instrument, and test name.
4. The Finish button will add your test(s) to your test menu.
