Account Profile
The Account Profile tab is where you will manage your main facility’s basic information including: demographics, contacts, and programs.
Demographics
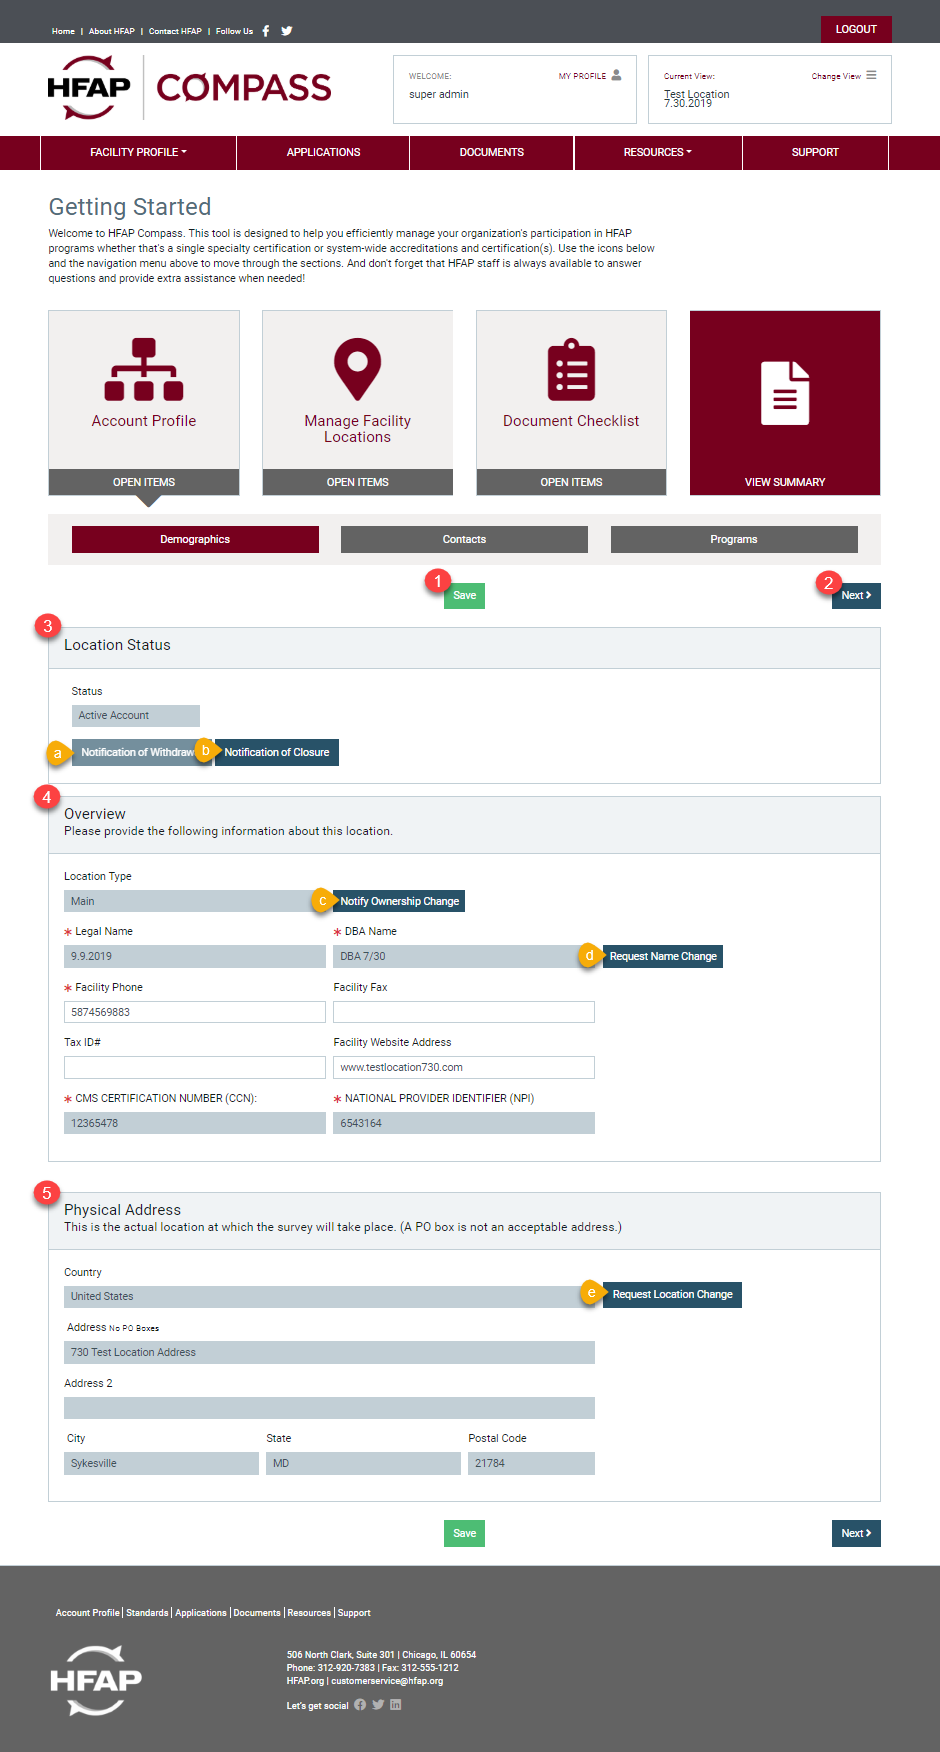
1. The Save button is used for saving any facility information so you can return to the Facility Dashboard or go to any other section of the HFAP Compass Tool without losing any entered information.
2. The Next button is used for when you have completed the section, and you would like to save and continue to the next section.
3. The Location Status section is where you can see the status of your facility and whether your account is active or inactive.
a. Clicking the Notification of Withdrawal button will open a pop-up window where you can request to be withdrawn from HFAP Accreditation/Certification. You can also request to be withdrawn by going to the Submit Change Request page under the Facility Profile tab.
b. Clicking the Notification of Closure button will open a pop-up window where you enter information regarding the closure of your facility to submit to HFAP. You can also submit a Notification of Closure by going to the Submit Change Request page under the Facility Profile tab.
4. The Overview section is to be completed with your facility’s location type, legal name, DBA name, facility phone number, facility fax number, tax ID number, facility website address, CMS certification number, and National Provider Identifier. Certain fields are non-editable and require a change request form to be changed once your account has been set up.
c. To change your location type, you must click the Notify Ownership Change button. Once clicked, a pop-up window will appear where you must answer questions regarding the change of ownership for your organization for HFAP’s approval. You can also submit a Notify Ownership Change request by going to the Submit Change Request page under the Facility Profile tab.
d. To change the facility’s name, you must click the Request Name Change button. Once clicked, a pop-up window will appear where you must answer questions regarding the facility name change for HFAP’s approval. You can also submit a Request Name Change request by going to the Submit Change Request page under the Facility Profile tab.
5. The Physical Address section is to be completed with the facility’s country, street address, city, state, and postal code. Once this information has been submitted, a change request form will be required to change the address.
e. To change the facility’s location information, you must click the Request Location Change. Once clicked, a pop-up window will appear where you must answer questions regarding a location address change for HFAP’s approval. You can also submit a Request of Location Change request by going to the Submit Change Request page under the Facility Profile tab.
Notification of Closure
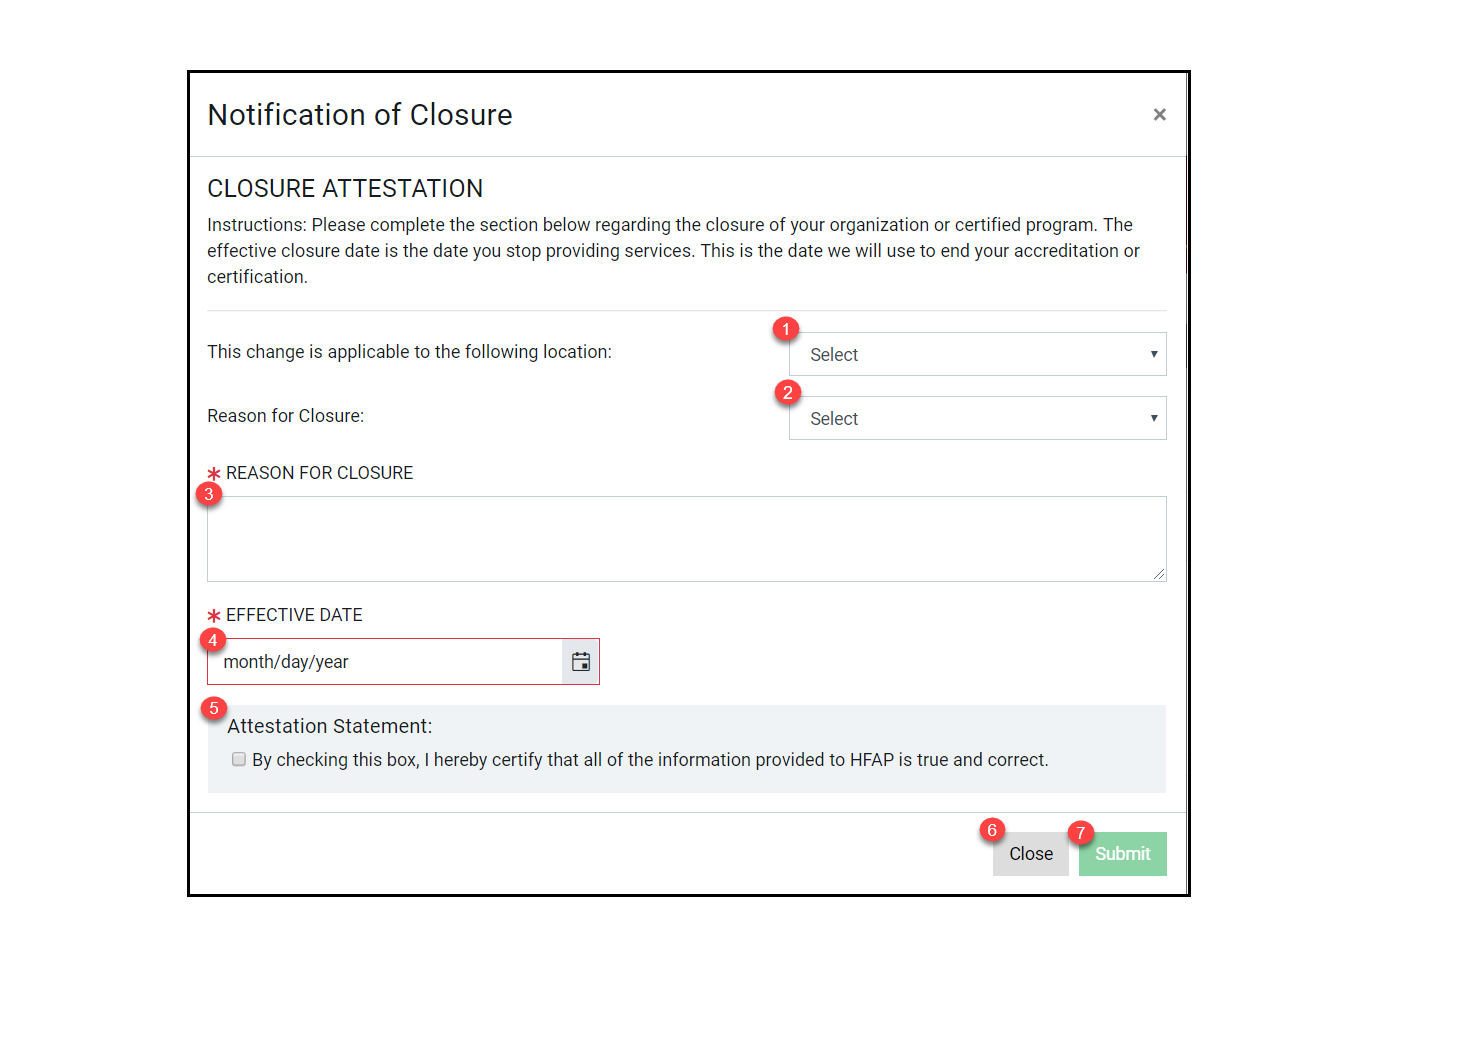
1. This change is applicable to the following location drop down menu will allow you to select the location that you are giving notification of closure about. This will be a complete list of all locations.
2. The Reason for Closure drop down will allow you to select a canned reason for closure.
3. The Reason for Closure text box is a free-form text box that will allow you to elaborate on your canned reason for closure.
4. The Effective Date is the date that the closure takes effect.
5. The Attestation Statement is a required checkbox that you must check to certify that the information provided to HFAP is true and correct.
6. The Close button will close the pop-up window without saving the entered information.
7. The Submit button will save all information entered and submit the change request to HFAP for approval. You will not be able to submit your request until all required information has been entered.
Change of Ownership
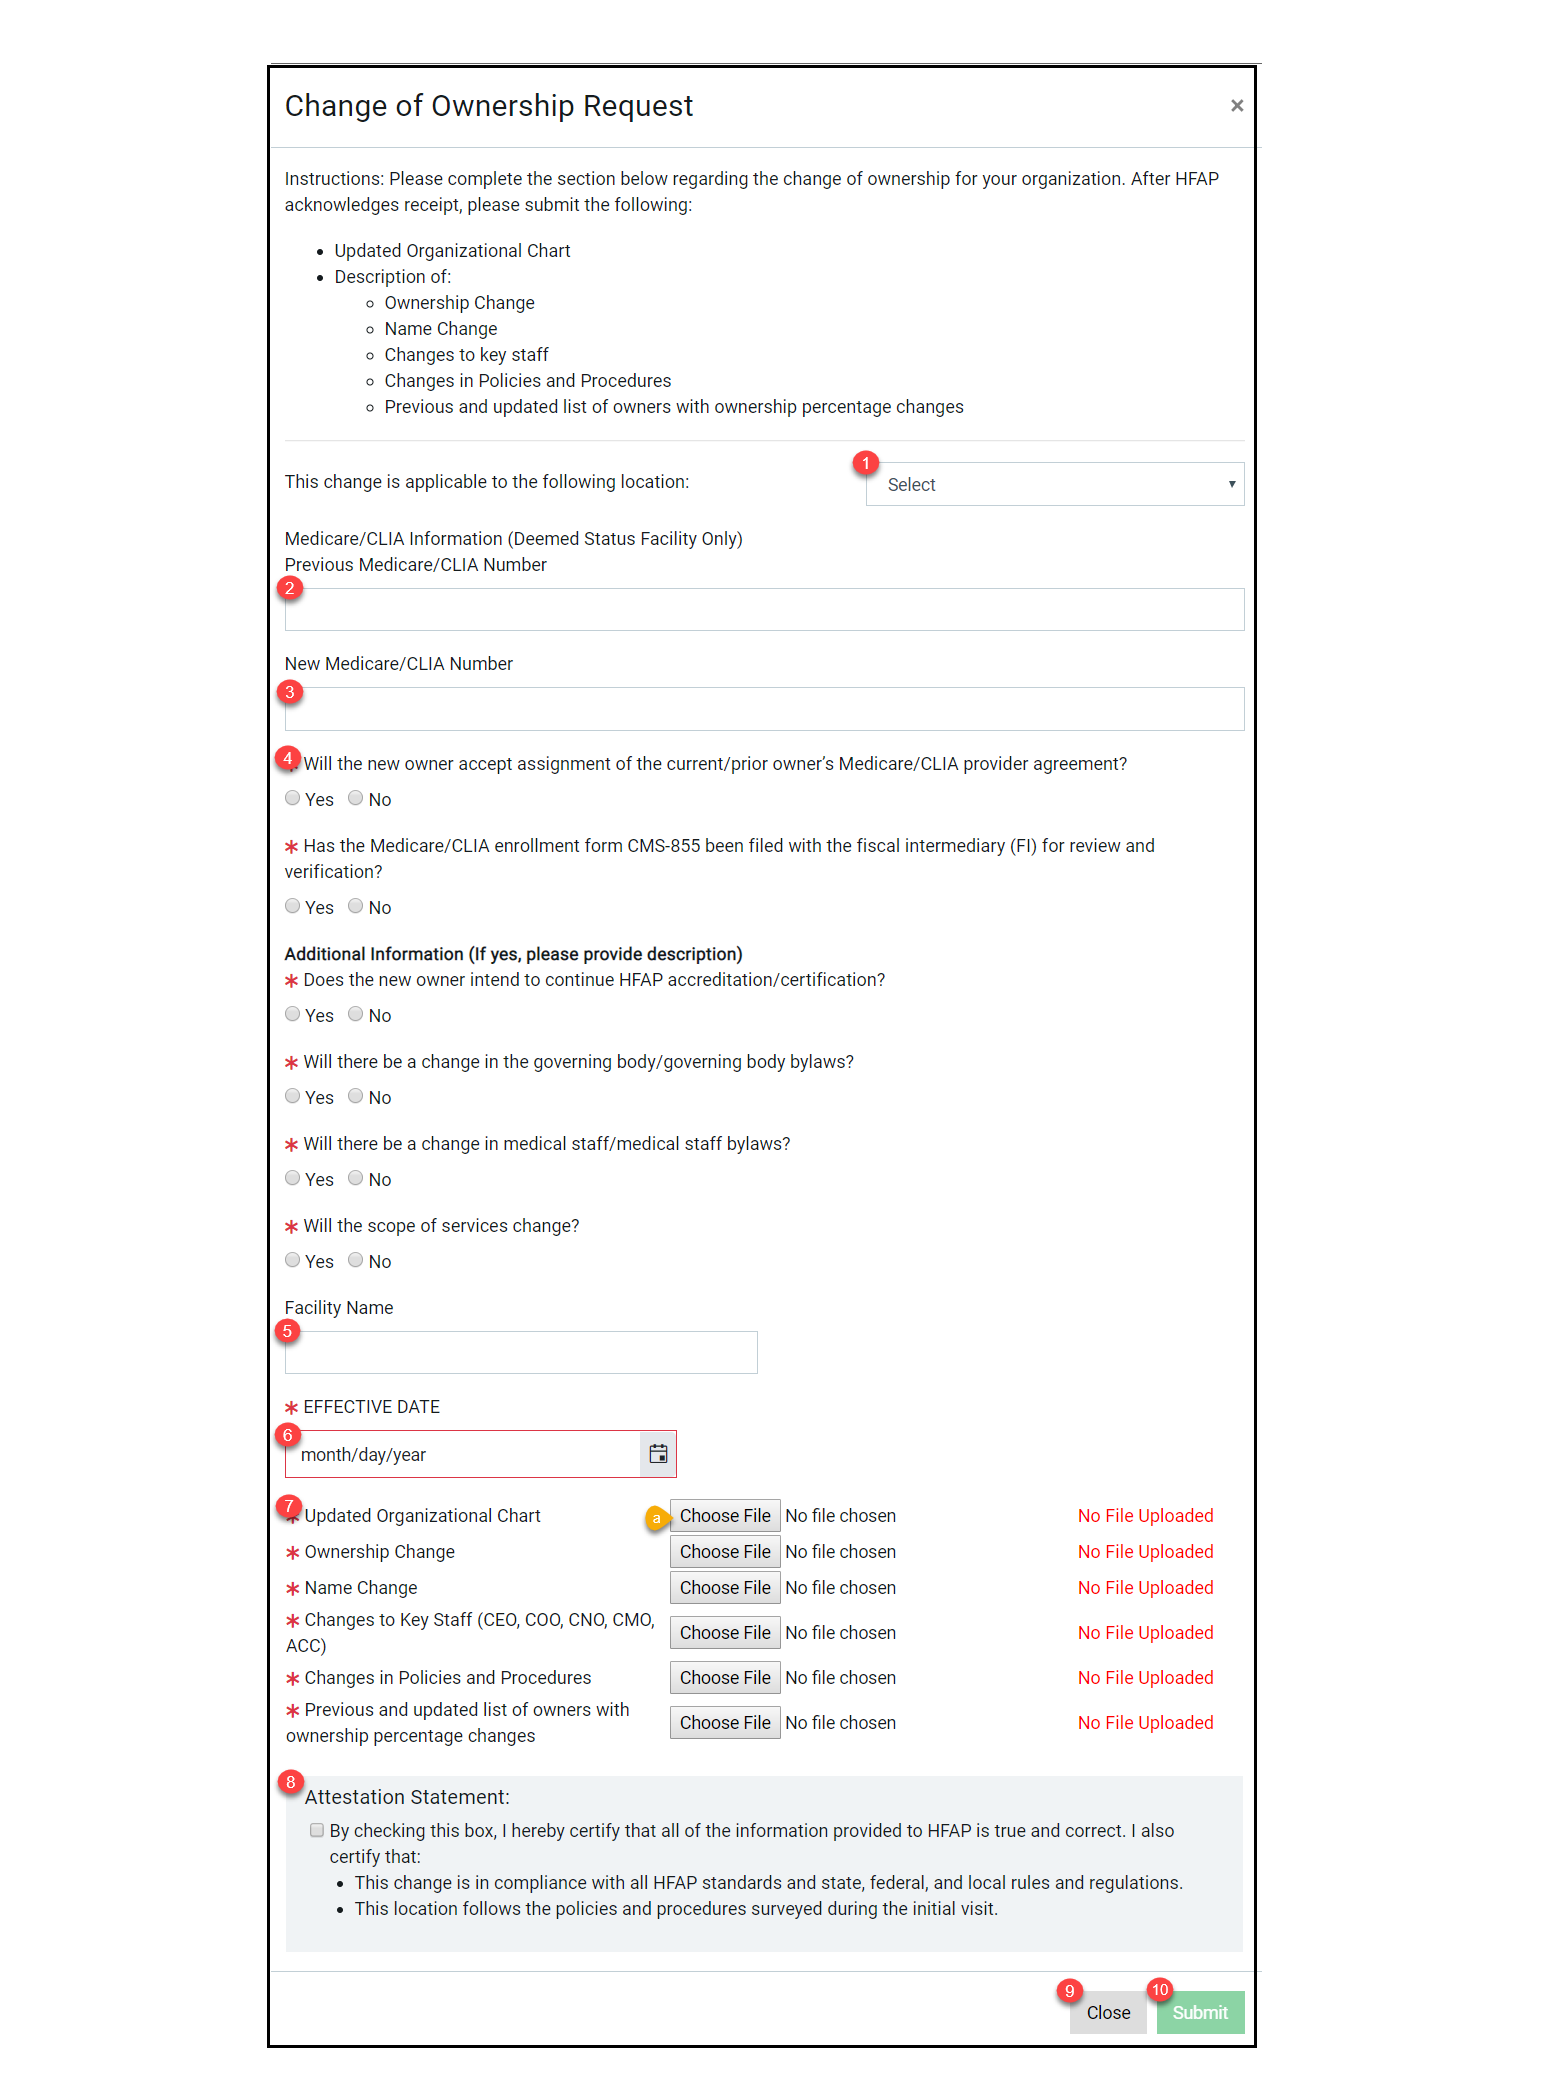
1. The change is applicable to the following location drop down menu will allow you to select the location that you are changing ownership for.
2. The Previous Medicare/CLIA Number field is for your location’s previous Medicare/CLIA Information for Deemed Status Facilities only.
3. The New Medicare/CLIA Number field is for your Location’s new Medicare/CLIA Number.
4. This yes/no section is for additional information regarding the change in ownership. If you select yes, a text box will appear where you must provide a description.
5. The Facility Name field is for the new facility name.
6. The Effective Date is when this ownership change takes effect.
7. These are the documents that are required to be submitted along with the change request form.
a. Click the Choose File button to select the file that will be uploaded.
8. The Attestation Statement is a required checkbox that you must check to certify that all of the information provided to HFAP is true and correct.
9. The Close button will close the pop-up window without saving the entered information.
10. The Submit button will save all information entered and submit the change request to HFAP for approval. You will not be able to submit your request until all required information has been entered.
Organization Name Change
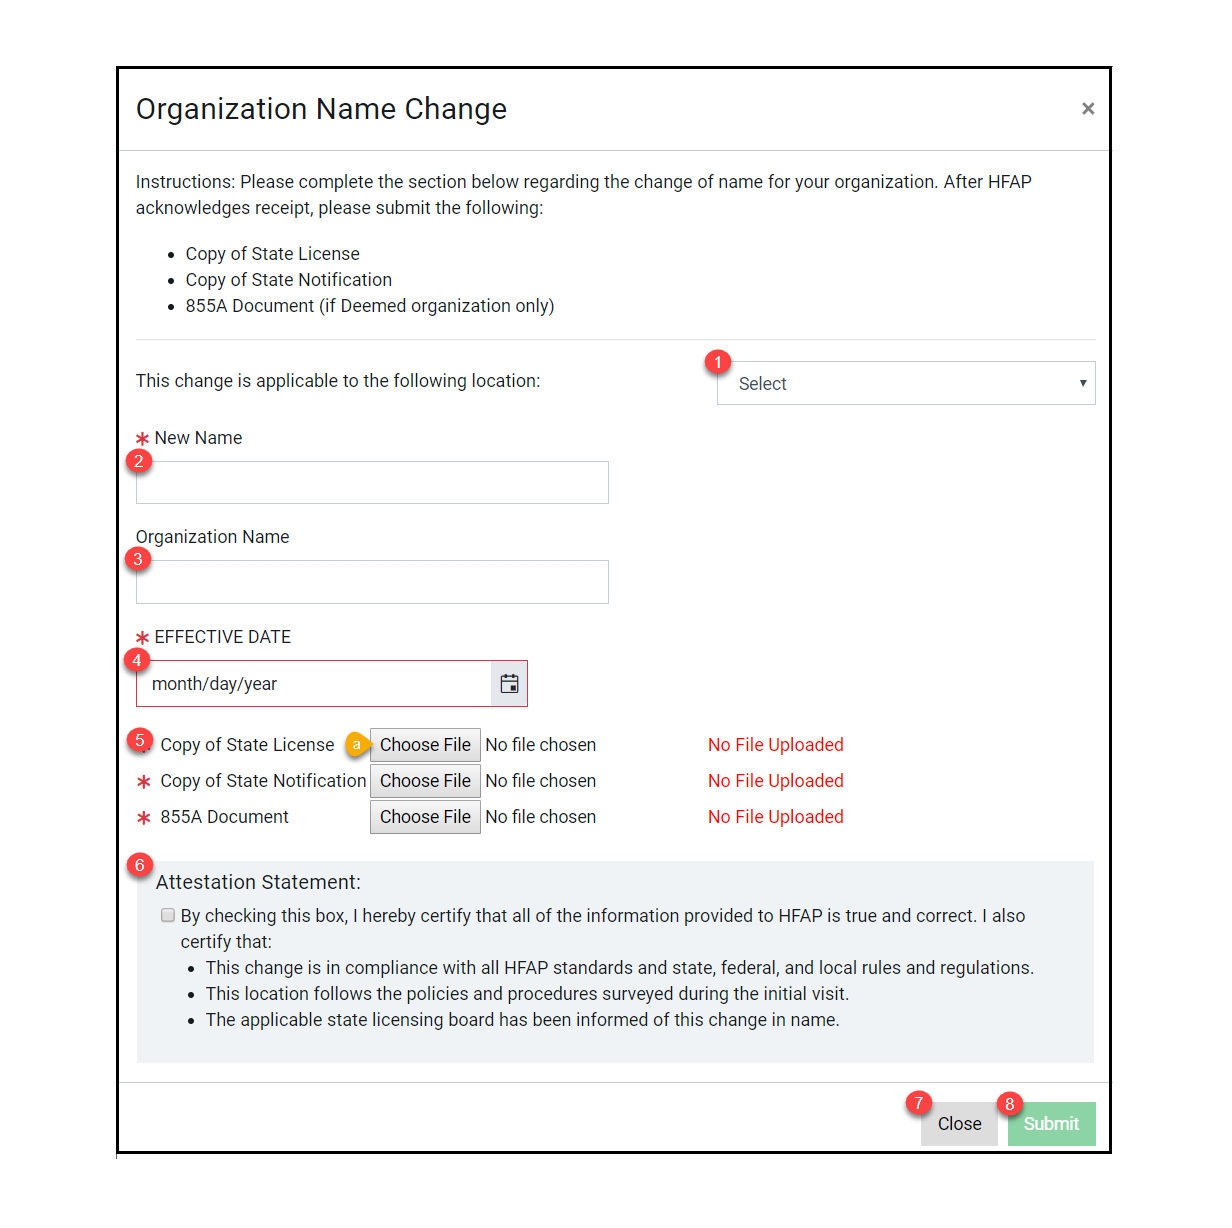
1. The change is applicable to the following location drop down menu will allow you to select the location that you are changing ownership for.
2. The New Name field is where you will enter the new name of your organization.
3. The Organization Name field is where you will enter your current organization name.
4. The Effective Date is when this ownership change takes effect.
5. These are the documents that are required to be submitted along with the change request form.
a. Click the Choose File button to select the file that will be uploaded.
6. The Attestation Statement is a required checkbox that you must check to certify that all of the information provided to HFAP is true and correct.
7. The Close button will close the pop-up window without saving the entered information.
8. The Submit button will save all information entered and submit the change request to HFAP for approval. You will not be able to submit your request until all required information has been entered.
Notify Organization Change
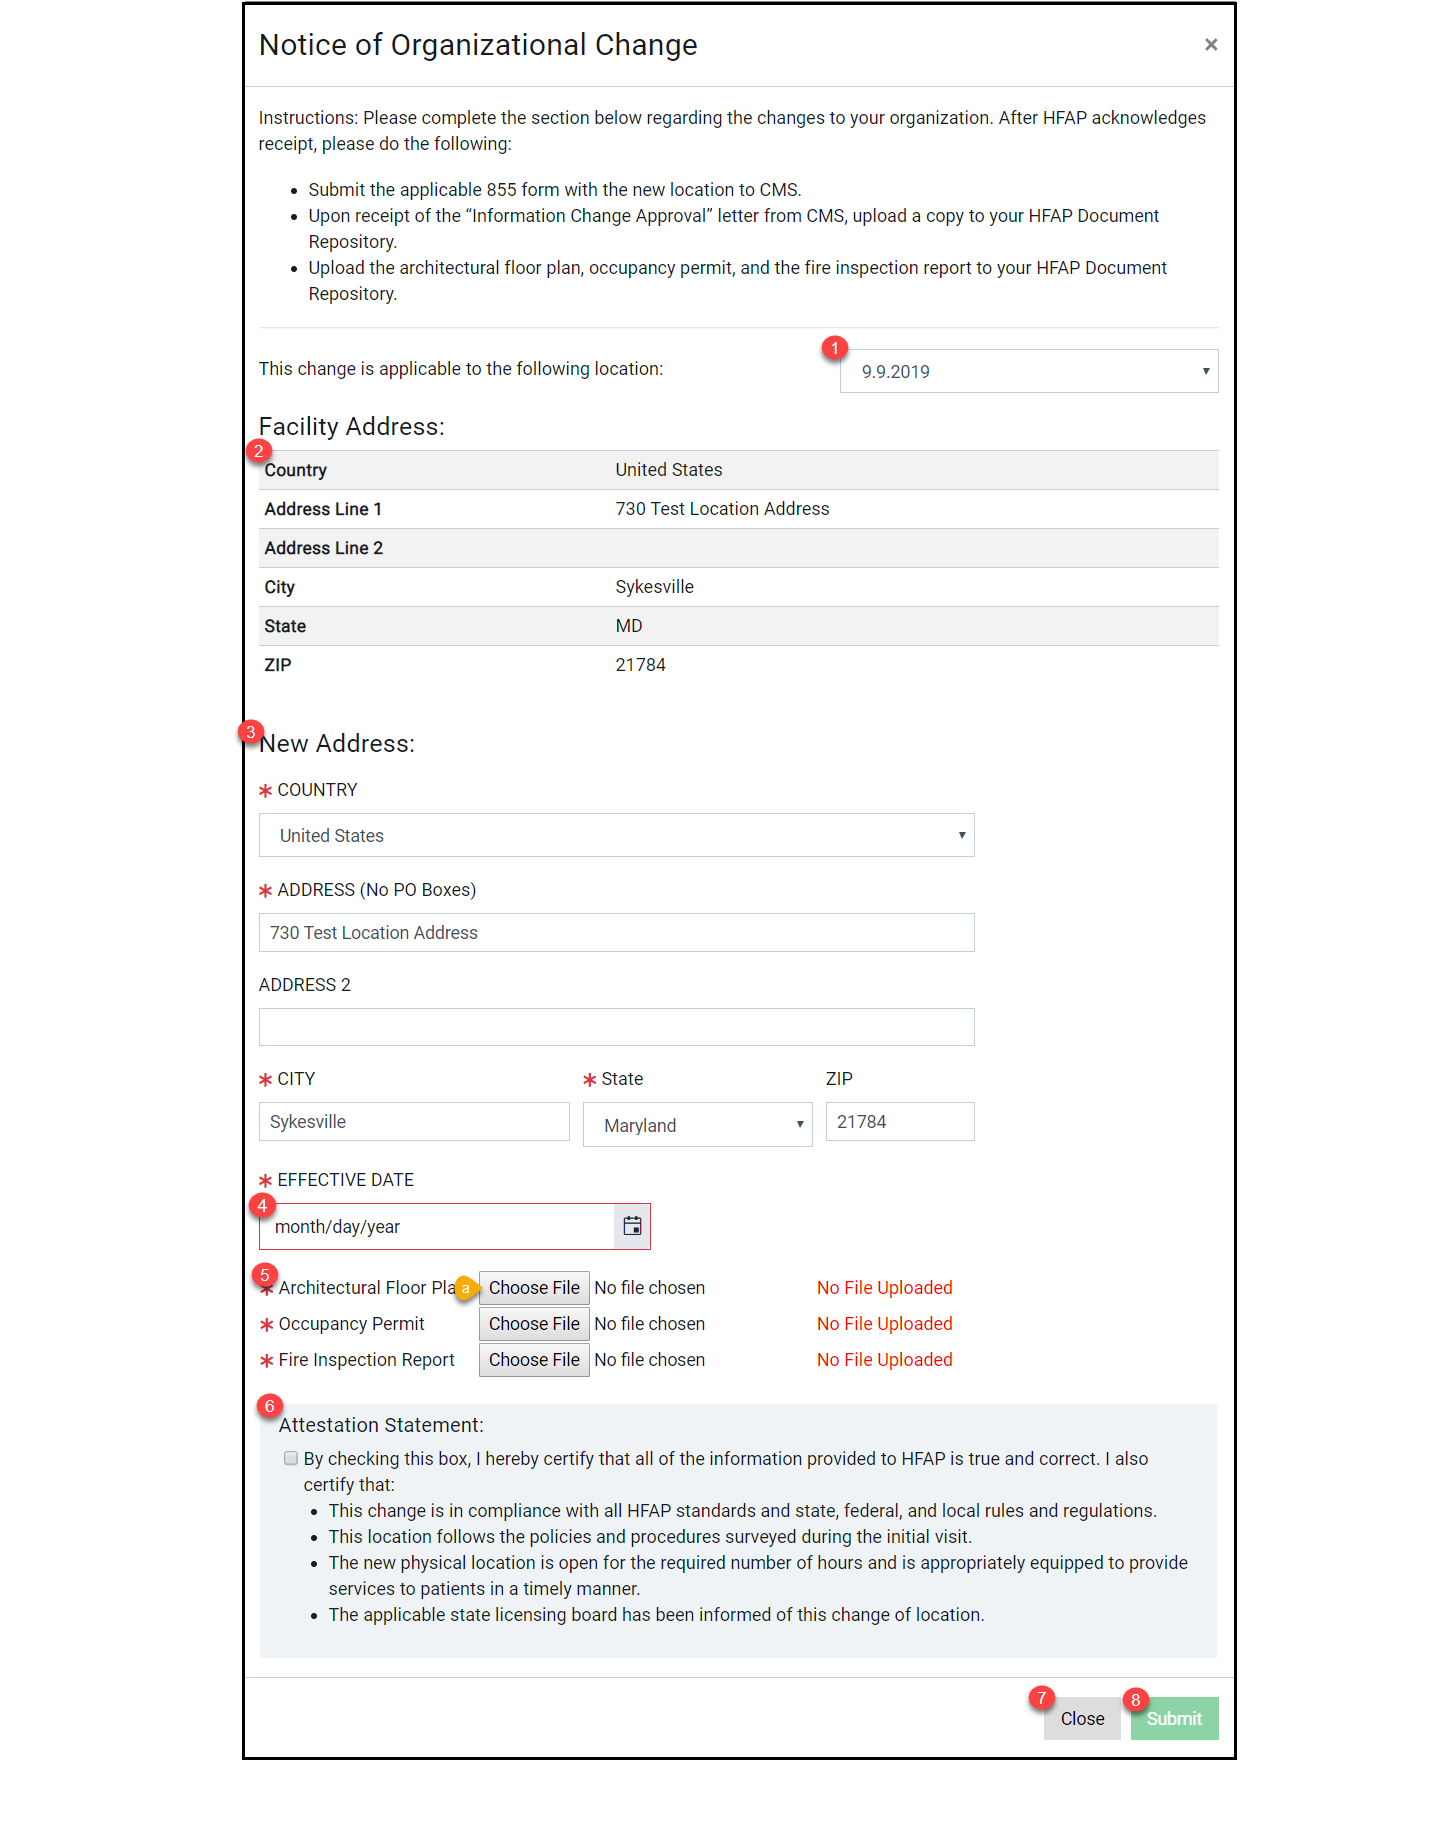
1. The change is applicable to the following location drop down menu will allow you to select the location that you are changing ownership for.
2. The Facility Address section is where you will see the organization’s current demographic information
3. The New Address section is where you will enter the new organization demographic information. This includes: country, street address, city, state, and postal code.
4. The Effective Date is when this ownership change takes effect.
5. These are the documents that are required to be submitted along with the change request form.
a. Click the Choose File button to select the file that will be uploaded.
6. The Attestation Statement is a required checkbox that you must check to certify that all of the information provided to HFAP is true and correct.
7. The Close button will close the pop-up window without saving the entered information.
8. The Submit button will save all information entered and submit the change request to HFAP for approval. You will not be able to submit your request until all required information has been entered.
Contacts
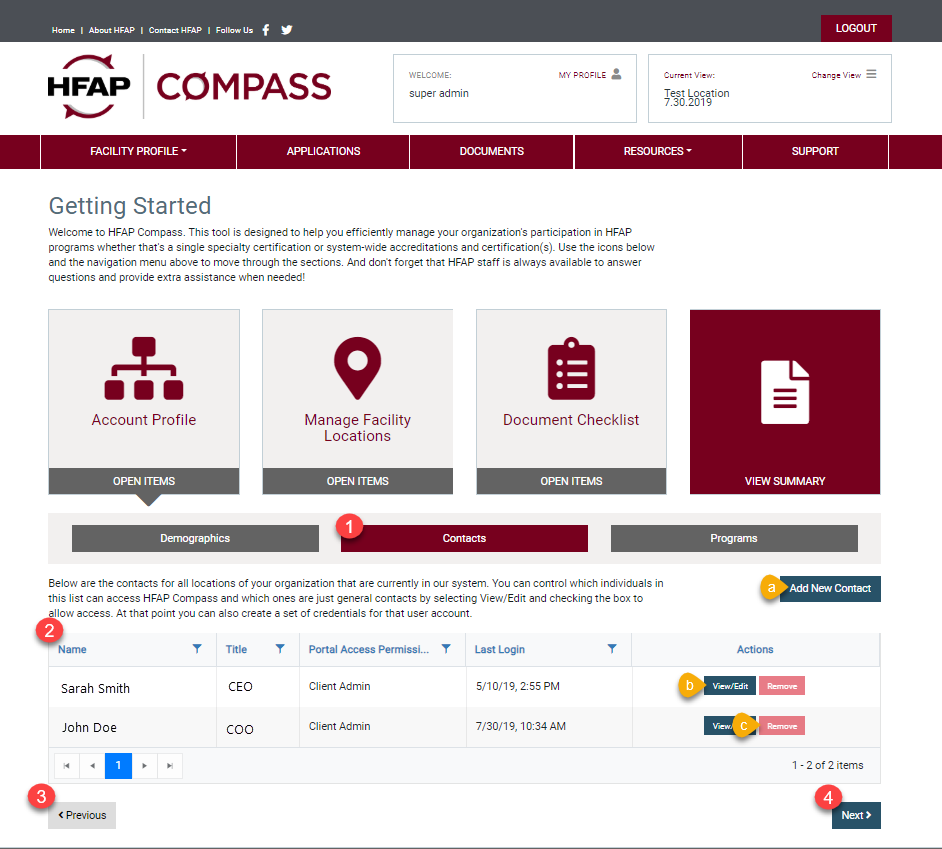
1. The Contacts section is where you will find a listing of all contacts for all locations of your organization that are currently in the system. This is where contacts for your facility are managed. You can view/edit an existing contact, or remove a contact that is no longer associated with your facility.
a. The Add New Contact button will allow you to quickly add a new contact to this list.
2. The contacts table will display all current contacts for all of your facilities. Displayed in the table will be: contact name, contact title, whether they have access to the client portal or not, and their last login. With this table, you are able to filter your contacts by each column.
b. The View/Edit button will open the contacts pop-up window and allow you to make changes to a contact within this list.
c. The Remove button will let you remove this contact from the list (your user permissions will define if you can do this or not).
3. The Previous button will save your information and take you back to the demographics page.
4. The Next button will save your information and take you to the next section of the account profile section, programs.
Add Contact
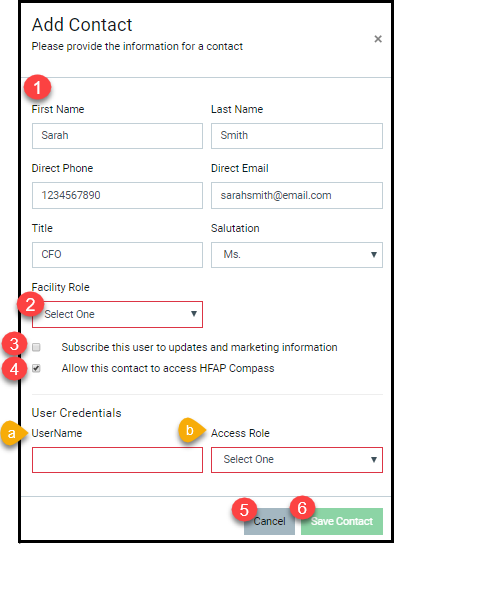
1. This section is where you will find the contact’s general information. This includes: first name, last name, direct phone number, direct email address, title. and salutation.
2. The Facility Role drop down menu is where you will select the contact’s role at the facility.
3. The Subscribe this user to updates and marketing information checkbox will send this user updates and marketing information.
4. The Allow this contact to access HFAP Compass checkbox will give this user access to the HFAP compass portal. Once this box is checked, the User Credentials section will appear.
a. The Username field is where you will enter the username that the contact will use to login to HFAP Compass.
b. The Access Role drop down menu is where you will select the role for the user. This will determine the level of control the user has within HFAP Compass.
5. The Cancel button will close the pop-up window without saving the entered information.
6. The Save Contact button will save the entered information, and add the new contact to the Contacts table.
Programs
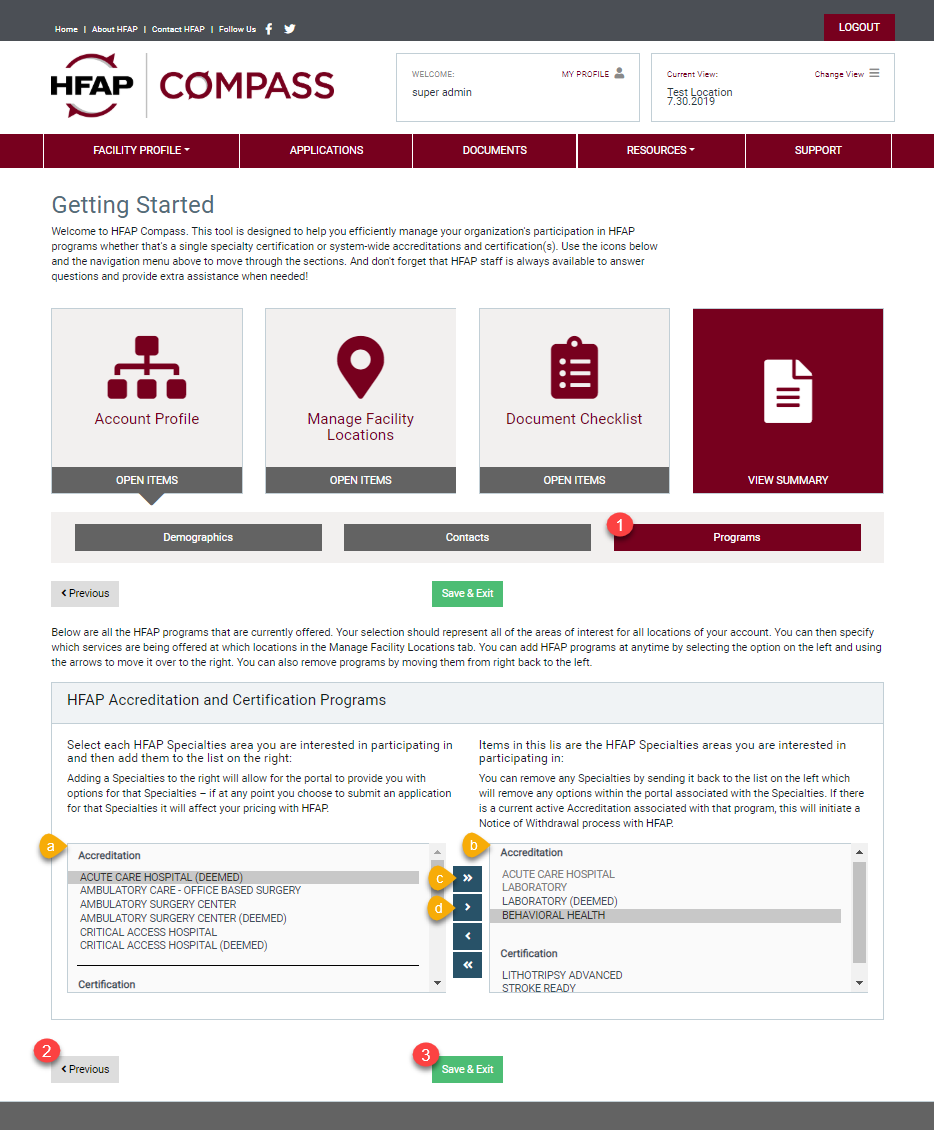
1. The Programs section is where your facility will manage what accreditation/certifications your facility, and any of it’s locations. are interested in.
a. This list is a complete list of all the programs that HFAP provide accreditation or certification for. The accreditation programs are listed under the Accreditation header and the certifications are listed under the Certification header.
b. This list is only the programs that your facility will be seeking accreditation or certification for.
c. This arrow will allow you to quickly move all listed programs over at once.
d. This arrow will allow you to move individual programs over one at a time.
2. The Previous button will save your information and take you back to the contacts page.
3. The Save and Exit button will save all of the entered information and take you back to the Getting Started page.
